After years of producing LED strips for contractors across Germany and Australia, I've seen how one wrong choice can ruin an entire renovation budget.
To choose the best LED strip lights for your home renovation, focus on color temperature consistency, voltage (24V for long runs), CRI above 90, appropriate IP rating for each room, and a supplier offering custom lengths with reliable batch-to-batch quality control.
Let me walk you through the four most critical decisions you'll face when specifying LED strips for any renovation project.
How can I ensure perfect color consistency across different batches for my high-end renovation project?
When we ship LED strips to a distributor in Melbourne, even a slight color shift between batches can trigger a full project rejection color temperature consistency 1. This is a real and expensive problem.
To ensure perfect color consistency across batches, demand LED strips binned within a 3-step MacAdam ellipse, request batch samples before bulk orders, and work with a supplier that uses single-bin LED chips and provides spectral test reports for every production run.
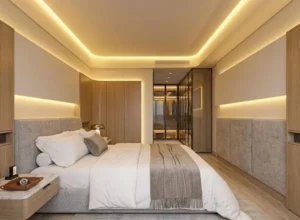
Why Color Variance Happens
Color variance comes from the LED chip manufacturing process. Each wafer produces chips with slightly different color temperatures. Cheap suppliers mix bins to fill orders faster. The result? Your kitchen cove lighting looks warm on one side and cool on the other.
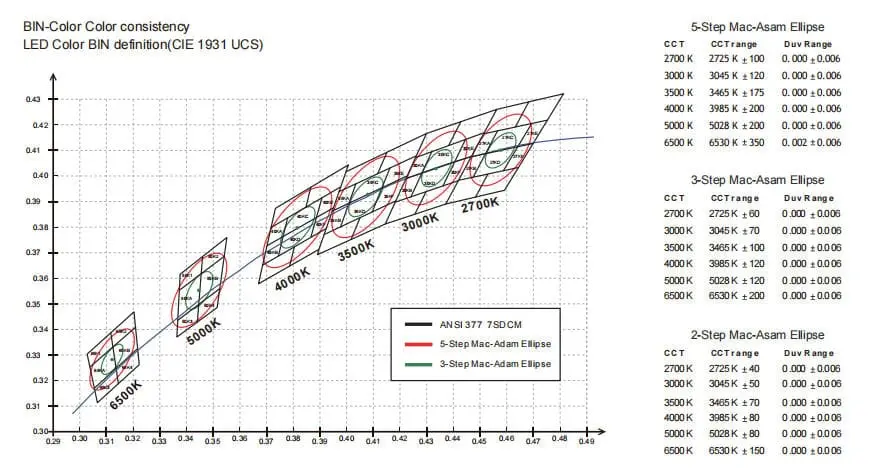
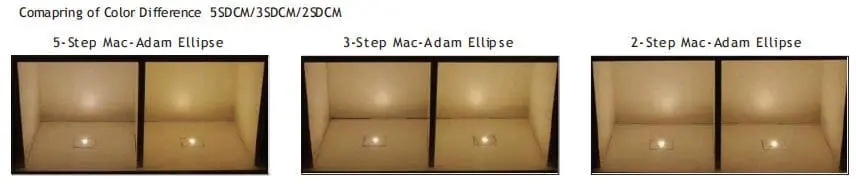
MacAdam Ellipse: The Key Metric
The MacAdam ellipse measures how much color can deviate before the human eye notices. Here's what each step means:
| MacAdam Step | Visible Difference | Typical Use Case |
|---|---|---|
| 1-step | Imperceptible | Laboratory reference |
| 3-step | Barely noticeable | High-end architectural lighting |
| 5-step | Noticeable side by side | Commercial retail |
| 7-step | Obviously different | Budget installations |
For any renovation where strips are visible together, you need 3-step or tighter.
What We Do Differently
On our production line, we sort chips into single bins before assembly. Every reel gets a spectral report showing CCT, CRI, and chromaticity coordinates. When a project needs 200 meters across three shipments, we reserve chips from the same bin lot. This costs more upfront but eliminates costly rework on site.
Practical Steps for Buyers
- Ask your supplier for the bin code on every reel.
- Request a pilot sample before each batch ships.
- Specify your acceptable CCT tolerance in the purchase order (e.g., ±50K).
- Store all reels from one batch together for the same room.
If your supplier cannot provide bin-level data, that's a red flag. Walk away.
What technical specifications should I look for to avoid voltage drop in my long-run LED installations?
We've tested hundreds of configurations in our lab, and voltage drop 3 is the single most common complaint from contractors installing runs over 5 meters. The light fades toward the end, and the client blames the installer.
To avoid voltage drop in long LED strip runs, choose 24V or 48V strips over 12V, use thicker copper PCBs (2oz or more), inject power from both ends or at intervals, and keep individual runs under the manufacturer's recommended maximum length.
Understanding Voltage Drop
Voltage drop happens because the copper traces on the PCB have resistance. The longer the strip, the more resistance. Less voltage at the end means dimmer LEDs. On a 12V strip, losing just 1.5V means a 12.5% brightness drop — clearly visible.
12V vs. 24V vs. 48V
| Specification | 12V Strip | 24V Strip | 48V Strip |
|---|---|---|---|
| Max recommended run | 3–5m | 7–10m | 15–20m |
| Current draw (same wattage) | High | Half of 12V | Quarter of 12V |
| Voltage drop severity | High | Moderate | Low |
| Power supply cost | Low | Moderate | Higher |
| Typical use | Short accent runs | Most renovation projects | Commercial long runs |
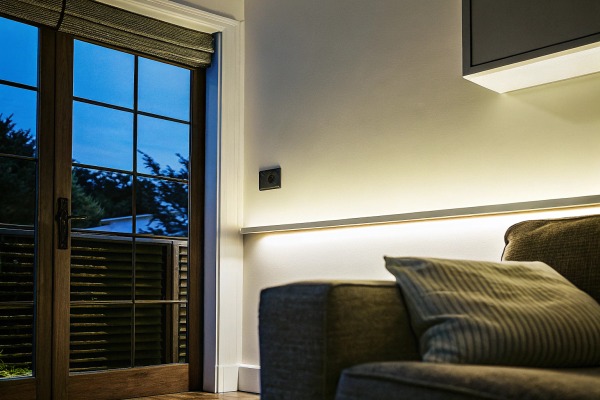
For home renovations, 24V is the sweet spot. It handles most room perimeters without needing multiple injection points.
PCB Copper Weight Matters
The copper traces act as wires. Thicker copper means less resistance. Standard budget strips use 1oz copper. Our project-grade strips use 2oz or 3oz copper, which cuts resistance significantly. Ask your supplier for the copper weight spec — if they can't answer, the product likely uses the thinnest possible option.
Power Injection Strategies
For runs beyond the recommended maximum:
- Dual-end feed: Connect power to both ends of the strip.
- Mid-point injection: Add a power feed at the center.
- Parallel runs: Split long distances into separate strips, each with its own feed.
Quick Calculation
A simple rule: if total current × trace resistance > 5% of supply voltage, you need injection. Our engineers provide calculation sheets for every project quote, so contractors don't have to guess.
How do I choose the right waterproof IP rating for my outdoor and bathroom lighting designs?
Our team fields this question weekly from designers in Australia, where bathroom and outdoor lighting regulations are strict. Choosing the wrong IP rating either wastes money or causes failures within months.
Choose IP20 for dry indoor areas, IP54 or IP65 for bathrooms and covered outdoor spaces, and IP67 or IP68 for direct water exposure or submersion. Match the rating to the specific zone in your design, not to the room as a whole.
IP Rating Decoded
IP stands for Ingress Protection 4. The first digit is dust resistance (0–6). The second is water resistance (0–9). Here's what matters for renovation:
| IP Rating | Protection Level | Suitable Locations |
|---|---|---|
| IP20 | No water protection | Living rooms, bedrooms, dry ceilings |
| IP54 | Splash-proof | Bathroom mirrors (Zone 2+), covered patios |
| IP65 | Jet-proof (surface coating) | Bathroom ceilings, semi-exposed outdoor |
| IP67 | Immersion-proof (silicone sleeve) | Garden paths, pool edges |
| IP68 | Continuous submersion | Underwater features, fountains |
Bathroom Zones
Most building codes divide bathrooms into zones:
- Zone 0 (inside bath/shower tray): IP67 minimum.
- Zone 1 (above bath to 2.25m height): IP65 minimum.
- Zone 2 (0.6m around bath/shower): IP54 minimum.
- Outside zones: IP20 is fine.
Don't over-specify. Using IP68 in a dry ceiling adds cost, bulk, and reduces heat dissipation. Under-specifying in a wet zone means early failure and potential safety hazards.
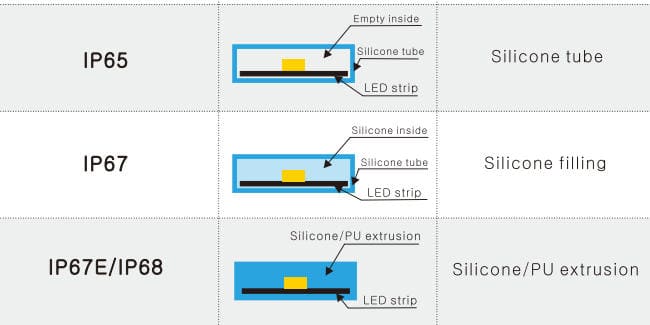
Waterproofing Methods and Trade-Offs
There are three common methods:
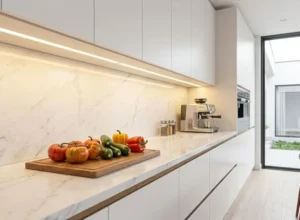
Nano-coating (IP54–IP65): Thin conformal coating on the PCB surface. Light weight, maintains flexibility, minimal impact on light output. Best for most bathroom and covered outdoor applications.
Silicone sleeve (IP67): Strip sits inside a silicone tube. Adds bulk, slightly reduces brightness, but excellent water protection. Good for garden installations.
Silicone-filled extrusion (IP68): Fully encapsulated. Heavy, rigid, expensive. Only needed for submersible applications.
Heat Dissipation Warning
Waterproofing traps heat. Higher IP ratings shorten LED lifespan if not managed. We always recommend pairing IP65+ strips with aluminum extrusion channels 5, which act as heat sinks. This keeps junction temperatures safe and extends lifespan well beyond 50,000 hours.
Regional Compliance
In Australia, electrical work in wet zones requires a licensed electrician and products meeting AS/NZS standards 6. In Germany, DIN VDE standards apply. We provide relevant test certificates with our IP-rated strips to simplify compliance for contractors.
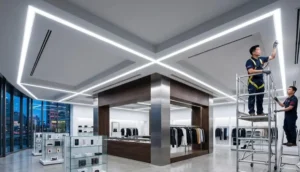
Where can I find a supplier that offers custom lengths and private labeling for my project needs?
When we first started working with private-label clients in Germany, their biggest frustration was suppliers who quoted custom work but delivered generic stock with a sticker slapped on. Real customization requires production flexibility.
Find a supplier offering true custom lengths and private labeling by looking for factories with low MOQs, in-house cutting and soldering capabilities, rapid prototyping turnaround, and transparent QC documentation — ideally one that handles packaging design, certification support, and logistics as a single point of contact.
What "Custom Length" Really Means
Standard LED strips cut at fixed intervals — every 25mm, 50mm, or 100mm depending on voltage and LED density. True custom length means:
- Cut to your exact project dimension (e.g., 1,437mm for a specific cabinet run).
- Pre-soldered connectors at both ends.
- Tested before shipping.
- Labeled with the exact length for easy site installation.
This eliminates on-site cutting mistakes and speeds up installation. For contractors managing 50+ units in an apartment block, this saves hours.
Private Labeling: Beyond a Logo
Professional private labeling 7 includes:
- Your brand on the strip's PCB (silk-screened).
- Custom packaging with your logo, specs, and compliance marks.
- Product labels matching your SKU system.
- Instruction sheets with your branding.
- Datasheet PDFs for your website or tender submissions.
How to Evaluate a Supplier
Ask these questions:
- What is your minimum order for custom lengths? (Good answer: 100–500 pieces.)
- Can you show me samples with my branding before bulk production? (Should be yes, within 7–14 days.)
- Do you provide IES files and spectral reports? (Essential for design firms.)
- Can you handle certification applications (CE, SAA, ETL) under my brand? (A major time saver.)
- What is your defect rate and how do you handle claims? (Look for <0.3% and clear warranty terms.)
Why a Single-Source Partner Saves Money
Many buyers source strips from one factory, power supplies from another, channels from a third, and packaging from a fourth. Coordinating four suppliers across time zones creates delays and finger-pointing when something goes wrong. A single partner managing the full BOM (bill of materials) cuts lead time and communication overhead dramatically. On our side, we stock-match power supplies and accessories to every strip order, so everything arrives together and works together.
The Real Cost of "Cheap Custom"
I've seen buyers lose entire shipments because a budget factory used the wrong LED bin to fill a custom order. The strips looked fine individually but clashed with existing installed sections. Rework cost more than the original order. Don't optimize for unit price alone. Optimize for total project cost, including rework risk.
Conclusion
Choose stable products over cheap ones. Pay attention to color temperature, voltage, IP rating, and installation method. Work with a supplier who understands your project needs end-to-end.
Footnotes
- Explains the importance of consistent color temperature in LED lighting. ↩︎
- Details the MacAdam ellipse and SDCM, crucial for LED color consistency. ↩︎
- Comprehensive guide on causes and solutions for voltage drop in LED strip lights. ↩︎
- Defines IP ratings and their significance for protecting lighting from solids and liquids. ↩︎
- Explains how aluminum channels protect LED strips and aid in heat dissipation. ↩︎
- Outlines Australian and New Zealand standards for lighting design and installation. ↩︎
- Discusses the benefits and considerations of private labeling for LED lighting products. ↩︎