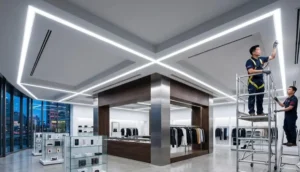
A nossa equipa de produção envia milhares de metros de fitas LED destinadas a sancas de teto e instalações em armários por toda a Europa e Austrália. No entanto, o feedback mais comum que recebemos dos instaladores não é sobre as próprias fitas — é sobre más escolhas de design e instalações descuidadas que arruínam o resultado final.
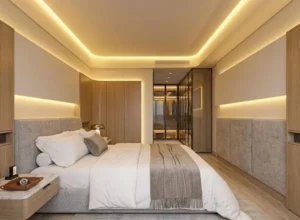
As luzes de fita LED são altamente eficazes para decoração de tetos e armários em casa, oferecendo poupanças de energia de até 80%, vidas úteis superiores a 50.000 horas e opções de cores versáteis. O seu sucesso depende de escolher a temperatura de cor correta, o nível de brilho e de usar difusores e canais de montagem adequados para um brilho uniforme e limpo.
Neste guia, explicamos as decisões-chave que precisa de tomar — desde a luminosidade e temperatura de cor 1 até comprimentos personalizados, consistência de cor e fiabilidade em longos percursos — para que o seu projeto de fitas LED ofereça o resultado refinado que a sua casa merece.
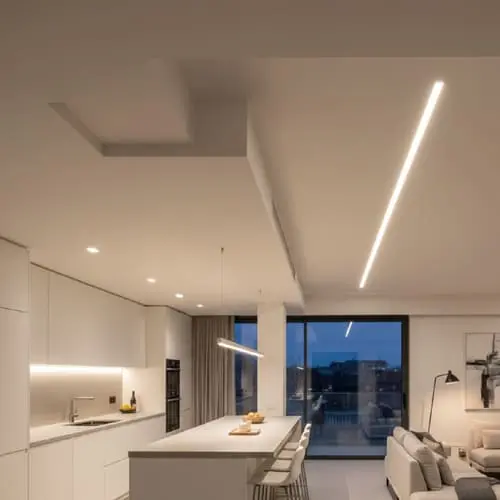
Como escolher o brilho e a temperatura de cor adequados para a iluminação do teto em moldura?
Uma lição que aprendemos cedo na nossa linha de produção é que a fita "mais brilhante" raramente é a melhor opção para uma sanca de teto. Os instaladores ligam-nos frustrados porque o cliente queria uma sala acolhedora, mas acabou com um espaço que parece um corredor de hospital. O problema quase sempre se deve a uma incompatibilidade entre a luminosidade, a temperatura de cor e a profundidade da sanca.
Escolha branco quente de 2700K–3000K com 400–600 lúmens por metro para espaços de convívio relaxados, ou branco neutro a frio de 4000K–5000K com mais de 800 lúmens por metro para cozinhas e áreas de trabalho. Ajuste a luminosidade à profundidade da sanca — sancas rasas precisam de menor intensidade para evitar pontos quentes.
Compreender a Temperatura de Cor
A temperatura de cor é medida em Kelvin (K). Números mais baixos transmitem uma sensação quente e amarelada. Números mais altos transmitem uma sensação fria e azulada. Eis um resumo simples:
| Temperatura de Cor | Aparência | Melhor Utilização |
|---|---|---|
| 2700K | Quente, semelhante à luz de vela | Quartos, salas de estar, áreas de jantar |
| 3000K | Branco quente suave | Áreas de convívio gerais, corredores |
| 4000K | Branco neutro | Cozinhas, casas de banho, escritórios |
| 5000K | Luz fria do dia | Garagens, áreas de trabalho, zonas de tarefas |
| 6500K | Luz do dia intensa | Espaços comerciais, utilitários |
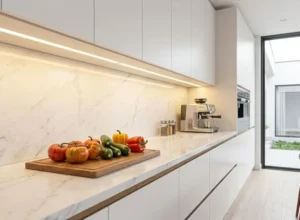
A maioria dos proprietários considera que 3000K é o ponto ideal. Sente-se acolhedor sem parecer amarelo. Para cozinhas e casas de banho, 4000K oferece clareza suficiente para ver as cores dos alimentos e tons de pele com precisão. Normalmente recomendamos fitas CRI 90+ para qualquer espaço onde a precisão das cores seja importante — debaixo de armários, junto a espelhos ou em zonas de confeção.
Ajustar o Brilho à Profundidade da Sanca
O brilho é medido em lúmens por metro 2. Mas os lúmenes sozinhos não contam toda a história. Uma sanca profunda (mais de 10 cm) absorve mais luz, por isso precisa de uma fita de maior intensidade. Uma sanca rasa (5–7 cm) reflete a luz rapidamente, por isso uma fita de menor intensidade funciona melhor e evita encandeamento excessivo.
Aqui está o que normalmente sugerimos com base na profundidade da sanca:
| Profundidade da Sanca | Lúmenes/m Recomendados | Densidade de LEDs | Uso Típico |
|---|---|---|---|
| 5–7 cm (rasa) | 300–500 lm/m | 60–120 LEDs/m | Brilho de destaque, ambiente acolhedor |
| 8–12 cm (média) | 500–800 lm/m | 120–240 LEDs/m | Apoio à iluminação geral da divisão |
| 12+ cm (profunda) | 800–1200 lm/m | 240–480 LEDs/m | Iluminação principal de teto |
A regulação de intensidade faz toda a diferença
Mesmo que escolha o brilho "perfeito", as divisões mudam ao longo do dia. Uma fita que parece ótima à noite pode parecer esbatida à tarde. Por isso, dizemos sempre aos nossos clientes para incluírem um regulador de intensidade de qualidade no orçamento. Reguladores PWM 3 funcionam melhor com fitas LED porque mantêm a consistência de cor em níveis baixos. Dimmers TRIAC baratos podem causar cintilação, especialmente abaixo de 20% de saída.
Um Erro Comum a Evitar
Muitas pessoas escolhem fitas RGB pensando que vão obter "todas as cores incluindo branco quente." Não vão. As fitas RGB misturam vermelho, verde e azul para aproximar o branco, mas o resultado parece rosado ou esverdeado — nunca verdadeiramente quente. Se quiser efeitos de cor e luz branca de qualidade, opte por fitas RGBW ou RGB+CCT 4. Estas incluem um chip LED branco dedicado juntamente com os canais de cor. As nossas fitas RGBW, por exemplo, usam um chip branco quente de 3000K separado para que tenha luz quente genuína quando precisa e cor total quando quiser experimentar.
Posso obter tiras de LED de comprimento personalizado que se encaixem nas dimensões específicas do meu armário sem juntas visíveis?
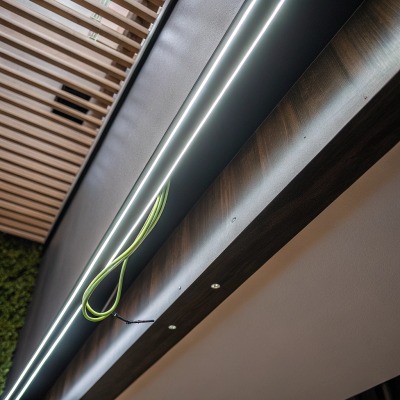
Esta questão surge constantemente por parte dos instaladores e distribuidores com quem trabalhamos em Portugal e em outros países. Têm ilhas de cozinha de formato estranho, armários em L ou vitrinas com dimensões não padrão. Cortar uma fita à medida é fácil. Tornar as uniões invisíveis — esse é o verdadeiro desafio.
Sim, tiras de LED de comprimento personalizado podem ser fabricadas ou cortadas no local para se ajustarem exatamente às dimensões do armário. Para eliminar juntas visíveis, use tiras de alta densidade (120+ LEDs/m) combinadas com canais difusores de alumínio, e solicite conexões soldados na fábrica em vez de conectores de clipe para linhas de luz contínuas e sem costuras.
Como Funciona o Corte Personalizado
As fitas LED têm marcas de corte — pequenas almofadas de cobre espaçadas a intervalos regulares. As fitas padrão podem ser cortadas a cada 5 cm ou 10 cm. Fitas de maior densidade permitem cortes a cada 2,5 cm. Quanto mais próximos os intervalos de corte, mais precisamente pode ajustar à largura do seu armário.
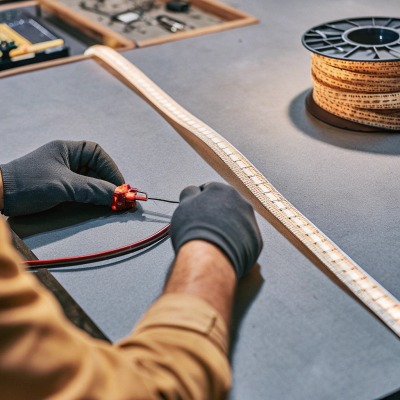
Na nossa instalação, oferecemos serviços de corte e soldadura de fábrica. Isto significa que cortamos à sua medida exata, soldamos os cabos de alimentação e aplicamos tubo termo-retrátil no ponto de ligação. O resultado é uma fita pronta a instalar, sem necessidade de trabalho em obra. Para o nosso distribuidor em Portugal, pré-cortamos e etiquetamos cada fita por zona do armário — "Ilha Esquerda 1420mm", "Superior Direita 890mm" — para acelerar a instalação no local.
Porque é que as Uniões Ficam Visíveis (e Como Resolver)
As uniões visíveis acontecem por três razões:
- Espaço entre segmentos da fita. Mesmo uma folga de 2 mm cria uma mancha escura. A soldadura de fábrica elimina esta folga.
- Sombras dos conectores. Os conectores de encaixe em plástico são volumosos. Ficam mais altos do que a superfície da fita e bloqueiam a luz. As soldaduras ficam ao nível da fita.
- Baixa densidade de LEDs. Com 30 ou 60 LEDs por metro, cada LED individual é visível como um ponto. Com 120 ou 240 LEDs por metro, os pontos fundem-se numa linha contínua e as pequenas juntas tornam-se invisíveis.
O Papel dos Perfis Difusores
Mesmo com soldadura perfeita, uma fita sem cobertura mostra os pontos individuais dos LEDs à curta distância — e os armários estão à curta distância. Por isso, os perfis de alumínio com tampas difusoras foscas são essenciais para trabalhos em armários. perfis difusores de alumínio 5 O difusor mistura a luz dos LEDs individuais numa iluminação suave e uniforme.
Existem dois tipos principais:
- Difusores opacos / foscos reduzem o fluxo luminoso total em cerca de 15–20%, mas proporcionam uma linha de luz perfeitamente uniforme. Ideais para frentes de armários e bordas visíveis.
- Difusores transparentes mantêm o máximo de brilho, mas pouco fazem para esconder os pontos individuais dos LEDs. Ideais para áreas onde a fita não está diretamente visível.
Para instalações em armários, recomendamos quase sempre difusores opacos. A pequena redução de brilho compensa para um acabamento limpo e profissional.
Classificações de impermeabilidade para armários de cozinha e casa de banho
Armários próximos de lavatórios ou fogões enfrentam humidade e gordura. Classificações de impermeabilidade 6 Uma fita IP20 básica funciona bem dentro de um roupeiro seco no quarto, mas armários de cozinha necessitam pelo menos de proteção IP54 (revestimento de silicone) ou IP65 (manga de silicone). Produzimos fitas IP67 com tubo de silicone completo para armários de casa de banho onde os salpicos de água são um risco real.
Como posso garantir que a consistência de cor das minhas fitas LED se mantenha uniforme ao longo de várias fases do projeto?
Certa vez, tivemos um distribuidor em Portugal que encomendou três lotes separados de fitas de branco quente 3000K ao longo de seis meses para uma renovação de hotel em várias fases. O primeiro lote parecia perfeito. O segundo lote parecia ligeiramente rosado ao lado do primeiro. O designer ficou furioso. Essa experiência ensinou-nos — e aos nossos clientes — que a consistência de cor entre lotes não é automática. Tem de ser planeada e controlada.
Para garantir uma cor uniforme ao longo das fases do projeto, especifique um intervalo de binning de LED apertado (por exemplo, elipse MacAdam de 3 passos), solicite ao seu fornecedor que reserve LEDs do mesmo bin para todas as fases e sempre teste amostras de cada lote contra uma fita de referência em condições idênticas antes da instalação.
O que é classificação de LEDs?
Os chips LED saem da linha de produção com pequenas variações. Mesmo dentro do mesmo lote, um chip pode emitir luz a 2980K e outro a 3050K. O olho humano consegue detetar diferenças tão pequenas como 50K quando duas fitas estão lado a lado.
Os fabricantes de LED classificam os chips em "lotes" com base nas suas coordenadas de cor medidas. Classificação de binning de LED 8 Um lote mais restrito significa menos variação. A medição padrão utiliza elipses MacAdam 9:
| Passo da Elipse MacAdam | Variação de Cor | Adequação |
|---|---|---|
| 1 etapa | Praticamente idêntico | Laboratório, médico |
| 3 etapas | Não é percetível para a maioria das pessoas | Arquitetura de topo |
| 5 etapas | Diferença ligeira visível lado a lado | Residencial de gama média |
| 7 etapas | Diferença percetível | Económico, uso geral |
Para qualquer projeto onde tiras de lotes diferentes fiquem visíveis em conjunto — como um teto de sala de estar e corredor adjacente — recomendamos fortemente a seleção de 3 passos. A nossa produção padrão utiliza MacAdam de 3 passos como padrão para todas as encomendas de nível profissional. Para uso residencial comum, 5 passos é aceitável se as tiras estiverem em divisões separadas.
Como Mantemos a Consistência Entre Lotes
Quando um cliente nos informa que o seu projeto irá abranger várias encomendas, tomamos várias medidas:
- Reservar o lote. Adquirimos chips LED suficientes do mesmo lote no início do projeto para cobrir todas as fases planeadas. Os chips são armazenados e alocados a cada encomenda.
- Amostra de referência. Produzimos uma tira de referência de 30 cm do primeiro lote. O cliente fica com uma e nós com outra. Cada lote futuro é comparado com esta referência sob iluminação controlada.
- Teste de envelhecimento. Os novos lotes são ligados durante 24 horas antes do envio. Isto elimina o pico inicial de brilho e permite-nos obter uma leitura estável para comparar com a referência.
- Documentação. Cada bobina é enviada com um relatório de teste que mostra CCT, CRI, lúmens e coordenadas de cor medidas (x, y no diagrama CIE). Os clientes podem verificar estes valores com a sua referência.
Dica Prática: Misturar Lotes na Mesma Instalação
Se for absolutamente necessário instalar fitas de dois lotes diferentes na mesma parede ou teto, coloque o ponto de transição numa separação natural — um canto, uma coluna ou uma junta de canal. O olho humano não compara a cor através dos cantos da mesma forma que compara duas fitas paralelas numa superfície plana. Este truque simples esconde eficazmente pequenas diferenças entre lotes.
Fatores Ambientais que Alteram a Cor
Mesmo fitas perfeitamente iguais podem parecer diferentes após a instalação se o ambiente for distinto. Um teto em madeira de tom quente irá refletir luz amarelada, tornando a fita mais quente. Um teto em gesso branco mantém a cor neutra. Superfícies brilhantes amplificam mais as alterações de cor do que superfícies mate. Faça sempre uma instalação de teste no material real antes de avançar para a encomenda completa.
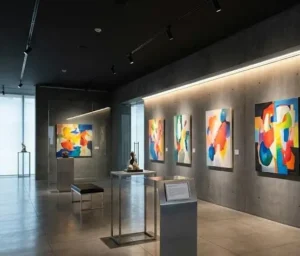
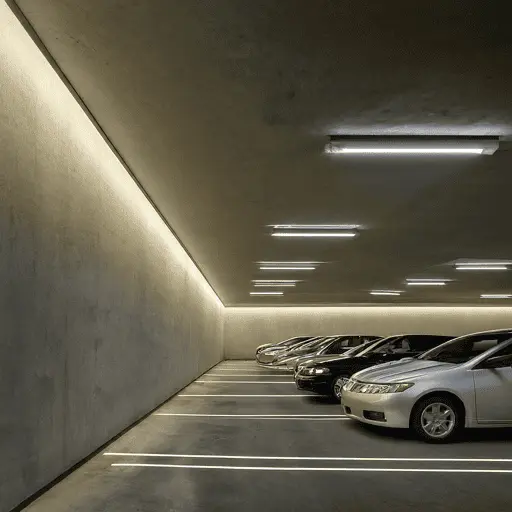
Quais são as soluções mais confiáveis a longo prazo para as minhas instalações de decoração de grande escala?
Instalações de grande comprimento — qualquer coisa acima de 5 metros numa linha contínua — são onde as fitas LED baratas falham de forma mais visível. Vemos isto constantemente: a fita começa brilhante junto à alimentação e diminui visivelmente em direção ao final. Ou pior, a cor muda de branco para amarelado ao longo do percurso. queda de tensão 10Para casas grandes com áreas de estar em open space, tetos falsos ou iluminação de sancas contínuas, acertar na engenharia para grandes comprimentos é inegociável.
As soluções mais confiáveis a longo prazo usam tiras de LED de corrente constante ou tiras de alta tensão (AC 220V/120V) que mantêm o brilho uniforme ao longo de 15 a 30+ metros sem queda de voltagem. Combine estas com canais de dissipação de calor de alumínio, drivers de qualidade e ligações soldados na fábrica para instalações que duram 50.000 horas sem mudança de cor ou escurecimento.
Porque Falham as Fitas Standard em Grandes Comprimentos
As fitas LED standard de 12V ou 24V DC sofrem de queda de tensão. A eletricidade percorre trilhos finos de cobre na PCB flexível. Ao longo da distância, a resistência aumenta e a tensão diminui. Os LEDs no final recebem menos energia, por isso brilham menos e por vezes mudam de cor. Numa fita de 12V, isto torna-se visível após apenas 3–5 metros. Numa fita de 24V, pode chegar aos 5–8 metros antes de se notar.
As soluções incluem:
- Injeção de energia — alimentar a fita a partir de ambas as extremidades ou em vários pontos intermédios. Eficaz, mas aumenta a complexidade da cablagem.
- Fitas de corrente constante — o driver regula a corrente em vez da tensão, garantindo que cada LED recebe a mesma energia independentemente da posição. Estas funcionam de forma fiável até 15–20 metros com uma única alimentação.
- Fitas de alta tensão (AC 110V/220V) — funcionam à tensão da rede, reduzindo drasticamente a corrente nos trilhos e praticamente eliminando a queda de tensão em 30, 50 ou até 100 metros. Produzimos fitas de 220V que os nossos clientes em Portugal instalam em corredores inteiros de apartamentos — 25 metros, um ponto de alimentação, zero diminuição de intensidade.
Comparação de Tecnologias de Fitas para Grandes Comprimentos
| Recurso | Fita 12V DC | Fita 24V DC | Corrente Contínua | AC 220V Alta Tensão |
|---|---|---|---|---|
| Comprimento máximo (alimentação única) | 3–5 m | 5–8 m | 15–20 m | 30–100 m |
| Queda de tensão visível? | Sim, após 3 m | Sim, após 5 m | Mínimo | Praticamente nenhuma |
| Necessita de driver? | Sim (externo) | Sim (externo) | Sim (especializado) | Rectificador incorporado |
| Regulável? | Sim (PWM) | Sim (PWM) | Sim (driver específico) | Sim (com regulador compatível) |
| Melhor para | Realces curtos | Cove médias | Quartos grandes | Casa inteira, comercial |
| Consideração de segurança | Baixa voltagem, seguro | Baixa voltagem, seguro | Baixa voltagem, seguro | Voltagem de rede, necessita isolamento adequado |
A Gestão do Calor é Metade da Batalha
As fitas LED geram calor. Não tanto como as lâmpadas halogéneo, mas o suficiente para degradar o adesivo, reduzir a vida útil dos LEDs e acelerar a alteração de cor se não for controlado. Em percursos longos, o calor acumula-se. Os canais de alumínio têm dupla função — servem como trilho de montagem e dissipador de calor. O canal afasta o calor da fita e dissipa-o pela sua área de superfície.
Para percursos superiores a 10 metros, recomendamos canais de alumínio com uma espessura de parede de pelo menos 1,5 mm. Canais finos de 0,8 mm parecem semelhantes, mas transferem mal o calor. Esta é uma daquelas áreas em que a opção barata sai mais cara a longo prazo devido a falhas prematuras.
Planeamento para Manutenção Futura
Instalações de grande escala devem ser projetadas para facilidade de manutenção. Isso significa usar fitas montadas em canais (que deslizam para dentro e fora) em vez de montagem direta com adesivo. Significa deixar pontos de ligação de energia acessíveis. E significa etiquetar cada percurso com as suas especificações — CCT, potência, modelo do driver — para que, se uma secção precisar de substituição daqui a cinco anos, a nova fita possa ser correspondida com precisão.
Incluímos uma ficha técnica com cada encomenda de projeto. Lista o código do lote, data de produção, compatibilidade do driver e número de peça recomendada para substituição. Os empreiteiros que mantêm estes registos poupam-se a grandes dores de cabeça quando surgem pedidos de manutenção anos depois.
Controlo Inteligente para Integração em Toda a Casa
Instalações modernas de percursos longos utilizam cada vez mais controlos inteligentes. Protocolos DALI, DMX ou Zigbee permitem controlar zonas de forma independente — escurecer o corredor, iluminar a cozinha, mudar a sala para âmbar quente. Agora vemos controladores compatíveis com Matter a entrar no mercado, prometendo interoperabilidade entre marcas. Para garantir o futuro, sugerimos aos nossos clientes que especifiquem drivers e controladores que suportem pelo menos um padrão aberto de casa inteligente, além da aplicação proprietária.
Conclusão
As fitas de luz LED são uma das ferramentas mais eficazes para decoração de tetos e armários — quando os detalhes são bem feitos. Escolha cuidadosamente a temperatura de cor e a luminosidade, invista em canais difusores adequados, exija uma seleção rigorosa de cor para projetos multifásicos e utilize fitas certificadas para percursos longos em espaços grandes. As próprias fitas são fiáveis. Os resultados dependem das decisões tomadas antes do dia da instalação.
Notas de rodapé
- Explica o conceito de temperatura de cor na iluminação e a sua medição. ↩︎
- Fornece a definição da unidade SI e explicação do fluxo luminoso. ↩︎
- Explica como funciona a regulação por modulação por largura de impulso (PWM) para LEDs. ↩︎
- Diferencia entre vários tipos de fitas LED RGB com opções de luz branca. ↩︎
- Detalha o propósito e os benefícios dos perfis de alumínio para fitas LED. ↩︎
- Explica as classificações IP para fitas LED e os seus níveis de proteção contra sólidos e líquidos. ↩︎
- Compara conectores soldados e sem solda, destacando a fiabilidade. ↩︎
- Descreve o processo de seleção de LEDs pelas características de cor e brilho. ↩︎
- Explica como as elipses de MacAdam são usadas para definir a consistência de cor dos LEDs. ↩︎
- Explica o fenómeno da queda de tensão em instalações de LED e as suas causas. ↩︎