When we review the feedback from our Australian partners, a recurring theme dominates the conversation: labor costs are eating into profit margins. We know that in cities like Sydney and Melbourne, an electrician's hourly rate can easily range from AUD 75 to AUD 200. At production facility, we have shifted our focus significantly over the last two years to engineer products that reduce time on site. We understand that for a contractor or wholesaler, the physical cost of the LED strip is often secondary to the cost of the hands installing it. The goal is no longer just providing light; it is providing a solution that minimizes wire stripping, soldering, and complex mounting.
To find easy-to-install COB LED solutions in Australia, prioritize pre-configured plug-and-play kits with Class II drivers that bypass the need for licensed electricians. Select 24V COB strips with high-density chips for dotless output without diffusers, and utilize factory-customized lengths with pre-soldered leads to eliminate on-site labor and soldering.
Finding the right balance between material cost and installation speed is critical for profitability. The following sections detail the specific features and strategies we recommend to our clients to keep project costs down without sacrificing quality.
What specific design features make COB LED strips faster to install for my projects?
In our R&D lab, we constantly compare the installation timelines of traditional SMD strips against modern COB (Chip-on-Board) technology. We have observed that the structural differences in COB technology inherently remove several time-consuming steps from the installation process.
COB LED strips feature a continuous phosphor coating that creates a dotless light effect, eliminating the need to install deep aluminum diffuser channels to hide hot spots. Additionally, high-quality COB strips utilize heavy-duty 3M VHB adhesive and wider copper PCBs, allowing for rapid peel-and-stick application directly onto surfaces without complex mounting hardware.
The "Dotless" Advantage and Diffuser Elimination
The most significant time-saver we see with COB technology is the elimination of the "hot spot" issue. Traditional SMD strips (like the 5050 or 2835 models) have distinct gaps between LEDs. To make these look professional, you must install them inside an aluminum profile with a milky diffuser cover. This involves measuring, cutting aluminum, drilling mounting holes, screwing the channel in, and then sticking the light.
With COB strips, which typically pack 320 to 480 chips per meter under a continuous phosphor gel, the light is uniform right out of the reel. For under-cabinet or cove lighting where the light source isn't directly visible, you can often skip the aluminum channel entirely. You simply adhere the strip to the joinery. This cuts installation time by approximately 50% per linear meter.
Adhesive Integrity and Thermal Management
Speed means nothing if the light falls down a month later. We apply 3M VHB (Very High Bond) red tape to our professional-grade COB strips because we know the Australian climate can fluctuate. Standard adhesive often fails on porous cabinetry surfaces, leading to warranty calls. Using VHB allows for a "one-and-done" application.
Furthermore, the design of the PCB (Printed Circuit Board) plays a role. We use 2oz or 3oz double-layer copper PCBs in our COB series. This acts as a built-in heat sink. While we still recommend a simple flat aluminum bar for high-wattage strips to ensure longevity (50,000+ hours), the superior thermal management of COB allows for more forgiving installation environments compared to older technologies.
Comparison of Installation Steps
To visualize the labor savings, we have broken down the typical workflow we see contractors perform.
| Feature | Traditional SMD Installation | COB LED Installation | Estimated Time Saving |
|---|---|---|---|
| Light Consistency | Requires deep aluminum channel + diffuser to hide dots. | Dotless output; can mount directly to surface or flat bar. | 30-40% |
| Mounting | Drill and screw channels, then stick strip. | Peel and stick (using VHB tape). | 20-30% |
| Cornering | Rigid; requires cutting and soldering wires for corners. | Flexible; can bend gently or use snap connectors. | 10-15% |
| Total Labor | High (Requires tools and precision). | Low (Minimal tools required). | ~50% Reduction |
By selecting a product that is engineered to be "finished" the moment it leaves the reel, you are effectively buying back hours of labor time.
How can I avoid time-consuming soldering by using quick-connect COB accessories?
We frequently test various connection methods to ensure that the electrical continuity remains stable over time. While soldering is traditionally the most secure method, we recognize that dragging a soldering station up a ladder in a client's kitchen is neither practical nor efficient for many installers.
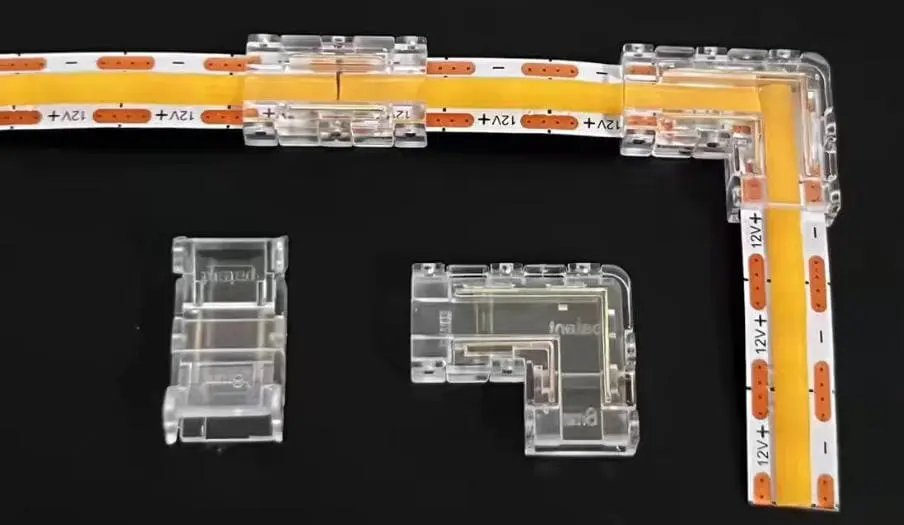
You can avoid soldering by utilizing transparent, high-current "hippoconnectors" or pierce-style clip-on joiners specifically designed for high-density COB strips. These accessories allow for secure board-to-board or board-to-wire connections in seconds by piercing the PCB contact points without requiring heat or specialized tools.

The Evolution of Solderless Connectors
In the past, "clip-on" connectors had a terrible reputation for coming loose or causing voltage drops. However, the new generation of connectors we source for our COB lines is different. They use a "piercing" mechanism rather than simple surface contact. When you clamp them down with pliers, metal teeth bite through the PCB insulation and lock into the copper pads. This creates a mechanical bond that is surprisingly resistant to vibration and thermal expansion.
Types of Quick-Connect Solutions
There are three main categories of connectors that speed up site work:
- Strip-to-Power (Pigtail): These have a connector on one end and flying leads on the other. They are used to connect the start of a run to the power supply.
- Strip-to-Strip (Middle Joiner): Used when you have two off-cuts that need to be combined. This reduces waste significantly.
- Corner Connectors (L-Shape or Flexible): These are vital. Bending a COB strip 90 degrees flat is impossible without damaging the circuit. A flexible wire joiner allows you to navigate corners in seconds.
Reliability vs. Speed
While we advocate for these connectors to save time, quality control is paramount. We advise our clients to look for transparent connectors. Why? Because you can visually verify that the strip is fully inserted and aligned before you crimp it. Opaque white connectors often lead to "blind" connections that fail.
Connector Specifications Guide
When sourcing these accessories, compatibility is key. A mismatch in width is the most common failure point.
| Connector Type | Best Use Case | Key Spec to Check | Installation Time |
|---|---|---|---|
| Transparent Pierce-Type | General joining, high reliability. | PCB Width (8mm or 10mm) & Pin Count (2-pin for single color). | < 30 Seconds |
| Fold-Over Clasp | Temporary setups or low vibration areas. | Contact pad alignment. | < 15 Seconds |
| Solder (Traditional) | Critical infrastructure, high vibration. | Temperature control (avoid melting COB gel). | 3-5 Minutes |
Using the right connector can turn a 2-hour soldering job into a 15-minute clip-and-go task. For Australian projects where every minute is billed at a premium, this hardware choice is a massive cost lever.
Should I source pre-cut or custom-length COB strips to save labor hours?
From our production line perspective, we see a growing trend of "kitted" orders destined for the Australian market. Instead of ordering 500-meter bulk rolls, many of our wholesaler clients are sending us specific project measurements—kitchen cabinet lengths, wardrobe run sizes, and shelving dimensions.
Sourcing pre-cut or custom-length COB strips significantly reduces labor hours by shifting the precision cutting, soldering, and waterproofing processes from the expensive job site to the manufacturing facility. This ensures factory-grade consistency, eliminates on-site waste, and allows for immediate installation upon delivery.
The Economics of Factory Customization
It might seem counterintuitive to pay a slightly higher unit price for custom lengths compared to buying a bulk reel. However, when you factor in the "fully loaded" cost of installation in Australia, the math changes.
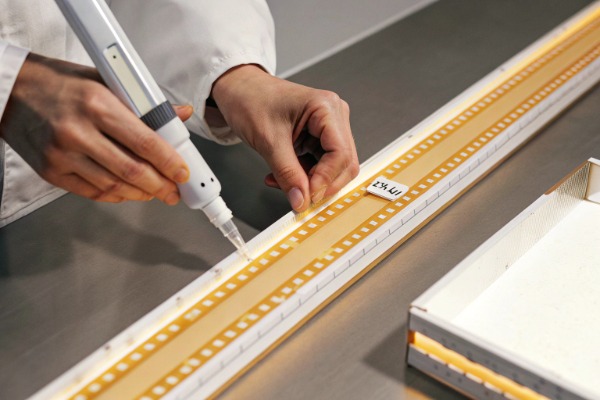
If an electrician has to measure, cut, solder lead wires, and heat-shrink every single segment of a kitchen install, they might spend 4 hours on site. At AUD 100+ per hour, that is AUD 400 in labor alone. If we perform that work at our factory, where we have automated soldering machines and standardized waterproofing procedures, the cost added to the product is nominal.
Quality Control and Waterproofing
Another major advantage of factory customization is waterproofing consistency. For outdoor or bathroom projects requiring IP65 or IP67 ratings 1, doing this on-site is risky. Sealing end caps with silicone by hand often leads to leaks if not cured properly.
When we produce a custom IP65 kit, we use machine-injected silicone or specialized glue sealing processes that are pressure tested. We deliver a product that is ready to be plugged in. This transfers the risk of failure from the installer to the manufacturer. If it leaks, it’s a warranty claim, not an installation error.
Systematizing the Order Process
To make this work, accurate data is required. We encourage our partners to adopt a "System Thinking" approach.
- Step 1: The designer or contractor provides a schedule of lengths (e.g., "Run A: 2400mm, Run B: 1200mm").
- Step 2: We manufacture to these exact specs, including lead wire lengths (e.g., "2-meter tail required to reach the driver").
- Step 3: We label each bag (e.g., "Kitchen Overhead").
Pre-Cut vs. Bulk Roll Analysis
| Factor | Bulk Roll (Site Cut) | Factory Pre-Cut | Impact on Project |
|---|---|---|---|
| Waste | High (Off-cuts often discarded). | Zero (You pay only for what you need). | Material Savings |
| Tools Needed | Soldering iron, cutters, heat gun, silicone. | None (Peel and stick). | Equipment Savings |
| Skill Level | High (Requires soldering skills). | Low (General labor). | Labor Flexibility |
| Speed | Slow (Prep work required). | Fast (Immediate install). | Timeline Acceleration |
For large commercial roll-outs or repetitive residential projects (like apartments), pre-cut kits are the single most effective way to bypass high local labor rates.
Do plug-and-play COB LED solutions actually lower my total project costs in Australia?
We often discuss regulatory compliance with our export clients, particularly regarding AS/NZS 3000 (the Wiring Rules). One of the biggest bottlenecks in Australian lighting projects is the legal requirement for a licensed electrician to perform any "fixed wiring" work. This creates a monopoly on installation that drives up costs.
voltage drop 2
Plug-and-play COB LED solutions lower total project costs by utilizing Class II external power supplies with standard Australian plugs, which legally classifies the lighting as a portable appliance rather than fixed wiring. This allows contractors, cabinet makers, or even end-users to install the system without hiring a licensed electrician.
The "Portable Appliance" Advantage
In Australia, if a device plugs into a standard GPO (General Power Outlet), it is generally considered a portable appliance. This distinction is crucial. It means a kitchen installer or a shop fitter can physically install the LED strips, route the low-voltage cables, and plug the driver into a socket provided by the builder. They do not need an electrical license to do this.
thermal management 4
If you choose a hardwired solution, an electrician must return to the site to terminate the connections. This "call-out" fee alone can exceed the cost of the hardware. By using a plug-and-play driver, you eliminate that specific site visit.
Clipsal 5
Wireless Control Integration
A common counter-argument is: "But we need wall switches." Historically, this required hardwiring. However, we now integrate Zigbee 3.0 or RF (Radio Frequency) controllers into the plug-and-play ecosystem.
3M VHB (Very High Bond) 6
These small controllers sit between the plug-in driver and the COB strip. They can be paired with a wireless battery-powered wall switch that looks exactly like a standard Clipsal plate but requires no wiring behind the wall. This gives the experience of a hardwired architectural system with the cost structure of a DIY setup.
Zigbee 3.0 7
Total Cost of Ownership (TCO) Calculation
Let's look at a hypothetical scenario for a 5-meter shelving project.
Scenario A: Hardwired Professional Install
- Materials (Strip + Driver + Profile): $150
- Electrician Labor (3 hours @ $120/hr): $360
- Total: $510
Scenario B: Plug-and-Play Solution
- Materials (COB Kit + Plug Driver + Wireless Switch): $200
- General Labor (Cabinet maker, 1 hour @ $60/hr): $60
- Total: $260
Safety and Compliance
While plug-and-play is cheaper, safety cannot be compromised. We ensure all our plug-in adaptors intended for Australia carry the RCM (Regulatory Compliance Mark) 8. Using non-compliant power supplies is illegal and dangerous. Furthermore, we recommend 24V systems for these setups. 24V carries half the current of 12V for the same power, reducing heat in the connectors and allowing for longer runs (up to 10 meters) without voltage drop, which simplifies the wiring topology for non-experts.
Cost-Benefit Breakdown
| Component | Hardwired Approach | Plug-and-Play Approach |
|---|---|---|
| Power Connection | Licensed Electrician Required. | DIY / Handyman Permitted. |
| Dimming | Complex wiring to wall dimmer. | Wireless RF/Zigbee pairing. |
| Flexibility | Permanent; difficult to move. | Modular; easy to relocate/upgrade. |
| Compliance | Strict AS/NZS 3000 adherence. | Product compliance (RCM) focus. |
By shifting the complexity into the product (the plug-in kit) rather than the labor, you align with the economic reality of the Australian market.
licensed electrician 9
Conclusion
Navigating the high labor costs in Australia requires a strategic shift in how we source lighting. By moving away from component-based sourcing and embracing factory-finished, plug-and-play COB solutions, you can dramatically reduce on-site hours. Whether it is utilizing dotless COB technology to skip diffusers, adopting quick-connectors to avoid soldering, or leveraging pre-cut kits to bypass electricians, the goal is clear: simplify the install to protect your margin.
AS/NZS 3000 10
Footnotes
- International standard definition for Ingress Protection ratings. ↩︎
- Explanation of the electrical phenomenon affecting circuit performance. ↩︎
- Background information on the material used to create white light. ↩︎
- Educational resource explaining thermal issues in LED lighting. ↩︎
- Official site of the major Australian electrical brand referenced. ↩︎
- Manufacturer product page for the specific adhesive tape mentioned. ↩︎
- Official alliance page for the Zigbee wireless communication standard. ↩︎
- Official government information on the Regulatory Compliance Mark. ↩︎
- Government licensing requirements for electrical work in Australia. ↩︎
- Official standard for wiring rules mentioned in the text. ↩︎


