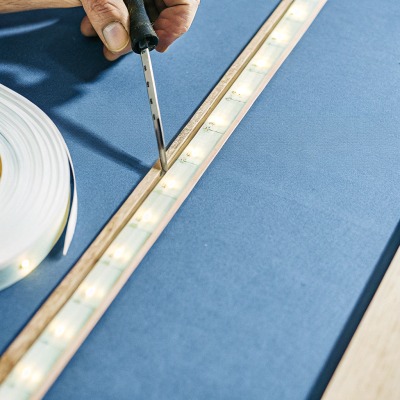
There's same problem got from contractors and wholesalers across Germany and Australia: LED strips that looked perfect at installation are now noticeably dimmer aluminum extrusion heat sinks 1. LED strip lights 2 It is frustrating. You invest in quality lighting for a commercial fit-out, and within months, the output drops. The client notices. The calls start coming in. And you are left wondering whether the product failed or the installation did.
LED strip lights lose brightness over time mainly due to heat buildup, natural lumen depreciation of the LED chips, voltage drop across long runs, and environmental damage from moisture or dust. Poor-quality components and bad thermal management accelerate this process dramatically, but proper design and installation can slow it down significantly.
The truth is, dimming is rarely caused by one single issue. It is almost always a combination of thermal stress, electrical losses, material aging, and environmental exposure working together. Below, we break down each factor so you can protect your projects and your reputation.
On our factory floor, we test strips inside sealed aluminum profiles for hundreds of hours before shipping. Even so, we see firsthand how trapped heat quietly destroys LED output. Heat is the silent killer of commercial lighting projects, and most buyers do not realize the damage until it is too late.
Heat-related lumen depreciation is prevented by using aluminum extrusion heat sinks, avoiding enclosed spaces without ventilation, keeping ambient temperatures below 45°C, and selecting strips with high-quality thermal substrates. Proper thermal planning at the design stage is far more effective than fixing problems after installation.
Why Heat Matters More Than You Think
LEDs are efficient. They convert more energy into light than incandescent or fluorescent sources. But they still produce heat. That heat concentrates at the LED junction 3, the tiny point inside the chip where electricity becomes light. When junction temperature rises, the chip degrades faster. The phosphor layer yellows. Solder joints weaken. The driver circuit loses stability. All of this adds up to lower brightness and shorter life.
Industry standards use a benchmark called L70 4. This is the point at which an LED's output drops to 70% of its original brightness. A well-managed strip might reach L70 after 50,000 hours. A poorly cooled one can hit that mark in under 10,000 hours.
Common Heat Traps in Commercial Installations
Many installation mistakes create heat traps. Here are the most common ones we see from project feedback:
- Mounting strips directly on wood or drywall without a heat sink
- Using narrow, sealed aluminum channels with no airflow
- Running strips in ceiling voids where ambient temperature exceeds 40°C
- Stacking multiple strip runs too close together
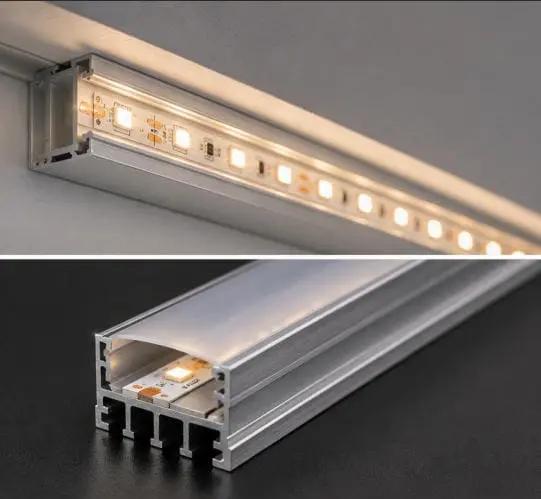
Heat Sink Options Compared
| Heat Sink Method | Thermal Performance | Cost | Best Use Case |
|---|---|---|---|
| No heat sink (bare adhesive mount) | Poor | Low | Temporary or decorative only |
| Thin aluminum channel | Moderate | Medium | Residential cove lighting |
| Deep aluminum extrusion with diffuser | Good | Medium-High | Commercial indirect lighting |
| Wide aluminum plate or custom heat sink | Excellent | High | High-power strips, enclosed spaces |
Practical Steps to Control Heat
First, always mount LED strips on aluminum. The 3M adhesive backing on most strips is not a heat management solution. It is a mounting convenience. Aluminum conducts heat away from the LEDs and spreads it across a larger surface area.
Second, check the ambient temperature of the installation space. If the strip will sit inside a ceiling void that reaches 50°C in summer, derate the expected lifespan accordingly. Our engineers recommend keeping the operating environment below 45°C for reliable long-term performance.
Third, consider the wattage per meter. A 20W/m strip generates significantly more heat than a 5W/m strip. Higher-density strips need bigger heat sinks. There is no shortcut here.
Finally, if the project involves recessed profiles, make sure the profile design allows some convective airflow. A completely sealed channel with no air gap becomes an oven over time.
Why is the quality of the LED chips and PCB copper thickness causing my strips to dim so quickly?
When we source LED chips for our Glowin product line, we run binning tests across every reel. The difference between a premium chip and a budget chip is invisible to the naked eye at first. But after 3,000 hours of operation, the performance gap becomes obvious. Cheap chips dim fast. Thin PCBs overheat. And your client's project suffers.
LED chip quality and PCB copper thickness directly control how fast strips lose brightness. Low-grade chips have weaker die bonds and inferior phosphor coatings that degrade quickly. Thin copper traces increase electrical resistance, generate extra heat, and worsen voltage drop, all of which accelerate dimming far beyond what proper-grade components would allow.
What Separates a Good LED Chip from a Bad One
Not all LED chips are created equal. The die, the phosphor, the encapsulant, and the wire bond all vary between manufacturers and grades. Premium chips from established fabs use purer semiconductor materials. Their phosphor layers are more uniform and resistant to photobleaching. Their encapsulants resist yellowing under prolonged exposure to blue light.
Budget chips skip these refinements. The phosphor degrades faster. The encapsulant clouds. The wire bond weakens. The result is a strip that dims noticeably within the first year.
PCB Copper Thickness: The Hidden Variable
The PCB is the backbone of an LED strip. Copper traces on the PCB carry current to every LED. When the copper is thin, resistance increases. Higher resistance means more heat generated along the trace, and more voltage lost between the power input and the LEDs at the far end.
Standard budget strips often use 1oz copper. Better strips use 2oz. High-performance strips for long runs and high-wattage applications may use 3oz or even thicker.
| PCB Copper Weight | Typical Use | Resistance Level | Heat Generation | Voltage Drop 7 on 5m Run |
|---|---|---|---|---|
| 1oz (35µm) | Budget decorative strips | High | High | Noticeable at 3-4m |
| 2oz (70µm) | Standard commercial strips | Moderate | Moderate | Manageable at 5m |
| 3oz (105µm) | Long-run / high-power strips | Low | Low | Minimal at 5m |
How Chip and PCB Problems Combine
Here is the critical point. Chip quality and PCB quality are not separate issues. They compound each other. A mediocre chip on a thin PCB runs hotter, receives less voltage, and degrades faster than that same chip would on a proper substrate. When suppliers cut corners on both the chip and the board, the strip's effective lifespan can drop to a fraction of what the datasheet claims.
This is why we always recommend asking your supplier for the chip brand, the chip bin grade, and the PCB copper weight before placing an order. These three data points tell you more about long-term brightness than any marketing claim.
What to Look for When Evaluating Strip Quality
- Ask for the LED chip brand and series number. Reputable brands include Cree, Samsung, Lumileds, and Nichia.
- Request the PCB copper thickness 8 specification. If the supplier cannot provide it, that is a red flag.
- Check whether the supplier provides LM-80 test data for the chips. This data predicts long-term lumen maintenance under controlled conditions.
- Look at the solder quality. Cold solder joints or uneven solder pads increase resistance and create weak points that fail over time.
How do environmental factors like moisture and UV exposure impact the long-term brightness of my outdoor installations?
Our team ships a lot of IP67 and IP68 strips 9 to Australia, where outdoor projects face intense sun, salt air, and sudden rain. Even with a high IP rating, we have learned that no waterproofing is permanent if the installation ignores environmental stress. Over time, nature always finds a way in.
Moisture infiltration degrades solder joints, corrodes copper traces, and clouds LED encapsulants, while UV radiation yellows plastic lenses and breaks down protective coatings. Dust accumulation traps heat and blocks light output. Together, these environmental factors can reduce outdoor LED strip brightness by 30–50% within two to three years if protective measures are inadequate.

Moisture: The Slow Destroyer
Water and electronics do not mix. When moisture enters an LED strip through a damaged seal, a poorly made connector, or a cracked encapsulant, it starts a chain of damage. First, it causes corrosion on the copper traces. Corroded copper has higher resistance, which means more heat and more voltage drop. Second, moisture can reach the LED die itself, causing short circuits or accelerating phosphor degradation. Third, trapped moisture inside a sealed profile creates condensation cycles that repeatedly stress solder joints.
IP ratings help, but they are not a lifetime guarantee. IP65 strips resist water jets but can fail if submerged or constantly exposed to high humidity without ventilation. IP67 strips handle temporary immersion. IP68 strips are designed for continuous submersion. Choosing the right IP rating for your actual installation environment is the first line of defense.
UV Exposure: Yellowing and Material Breakdown
Ultraviolet radiation 10 from sunlight attacks the organic materials in LED strips. The plastic lens or diffuser cover can yellow over time, reducing light transmission. The silicone or epoxy encapsulant protecting the LED chip can also degrade, becoming cloudy or brittle. This is a slow process, but in direct-sun installations, it becomes visible within one to two years.
UV-stabilized materials help. Some manufacturers add UV inhibitors to their silicone coatings and lens materials. But even with these treatments, direct sun exposure will eventually cause some degradation. The best practice for outdoor projects is to mount strips in shaded or indirect locations whenever possible, or use UV-resistant aluminum profiles with polycarbonate diffusers.
Dust and Dirt: Lumen Dirt Depreciation
Dust is easy to overlook, but it has a real impact. A layer of dust on an LED strip does two things. First, it physically blocks light from leaving the surface. Second, it acts as an insulating blanket that traps heat against the strip. The industry term for this is Lumen Dirt Depreciation (LDD). In dusty environments like warehouses, workshops, or construction zones, LDD can reduce visible output by 10–20% within months.
| Environmental Factor | Primary Damage Mechanism | Typical Brightness Impact | Prevention Method |
|---|---|---|---|
| Moisture / Humidity | Corrosion, short circuits, solder stress | 15–30% loss in 2 years | Correct IP rating, sealed connectors, drainage |
| UV Radiation | Yellowing of lens/encapsulant, phosphor damage | 10–20% loss in 2-3 years | UV-stabilized materials, shaded mounting |
| Dust Accumulation | Light blockage, heat trapping | 10–20% loss in 6-12 months | Regular cleaning, enclosed profiles |
| Salt Air / Corrosive Atmosphere | Accelerated copper and solder corrosion | 20–40% loss in 1-2 years | Marine-grade coatings, stainless connectors |
| Extreme Temperature Swings | Thermal cycling cracks in solder and encapsulant | 10–25% loss in 2-3 years | Flexible silicone coatings, stress-relief design |
Protecting Outdoor Installations
For any outdoor project, I recommend the following steps:
- Match the IP rating to the actual exposure. Do not assume IP65 is enough for all outdoor use.
- Use marine-grade connectors and stainless steel mounting hardware in coastal locations.
- Apply a secondary silicone seal at all cut points and connection joints.
- Design the mounting to allow drainage. Water that pools around a strip will eventually penetrate any seal.
- Schedule periodic cleaning, especially in dusty or pollen-heavy environments.
- Choose strips with UV-stabilized coatings if any part of the installation faces direct sunlight.
What quality control steps should I demand from my supplier to guarantee my private-label LEDs don't lose their intensity?
When we onboard a new private-label partner, the first conversation is never about price. It is about QC. Because if your branded product dims in the field, it is your reputation on the line, not the factory's. We have built our QC process around the specific failure modes that cause brightness loss, and we believe every buyer should demand the same from any supplier.
To guarantee long-term brightness for private-label LED strips, demand incoming material inspection reports for LED chips and PCBs, require LM-80 data for the LED packages, insist on in-line thermal and electrical testing during production, and mandate aging tests on finished goods before shipment. Written QC protocols with measurable pass/fail criteria are essential.
Incoming Material Inspection
Everything starts with the raw materials. Before a single LED is soldered onto a PCB, your supplier should be testing what comes through the door. This means verifying LED chip bin codes against the agreed specification, measuring PCB copper thickness with a micrometer, and checking driver IC batch numbers against approved lots.
If your supplier does not inspect incoming materials, they are gambling with your brand. A single bad reel of LEDs can contaminate an entire production batch. And you will not know until the strips are installed and running for months.
In-Line Testing During Production
Good factories test at multiple points during assembly. After the SMT (surface mount technology) process, every panel should be visually inspected and electrically tested. After reflow soldering, a sample should be checked for solder quality under magnification. After cutting and connector assembly, every strip should be powered on and checked for dead LEDs, flickering, and color consistency.
Here is a minimum in-line QC checklist to discuss with your supplier:
- Post-SMT visual inspection for component placement accuracy
- Post-reflow solder joint inspection under 10x magnification
- 100% power-on test for dead LEDs and flickering
- Color temperature spot check against the agreed CCT bin
- Voltage drop measurement at the rated length
Aging Tests: The Most Important Step Most Buyers Skip
An aging test, sometimes called a burn-in test, runs the finished strips at full power for a set period, typically 8 to 24 hours, before packaging. This catches early failures. LEDs that are going to die young usually fail within the first few hours of continuous operation. Without an aging test, those defective units ship directly to your customer.
We run a minimum 12-hour aging test on every batch. During that test, we measure lumen output at the start and at the end. Any strip that shows more than 3% drop during the aging period is flagged for investigation.
What Documentation to Require
| Document | What It Proves | When to Request |
|---|---|---|
| LM-80 Test Report (for LED chip) | Long-term lumen maintenance data under controlled conditions | Before approving the LED chip selection |
| Incoming Material Inspection Report | Chip bin codes, PCB copper weight, driver IC specs match the agreed BOM | With every production batch |
| In-Line QC Report | Solder quality, electrical test results, color consistency | With every production batch |
| Aging Test Report | No early failures, stable output over burn-in period | With every production batch |
| Final Inspection Report (AQL-based) | Cosmetic, dimensional, and functional checks on packed goods | Before shipment |
Setting Clear Pass/Fail Criteria
Vague quality agreements lead to disputes. Be specific. Define acceptable CCT tolerance (e.g., ±100K from the target). Define maximum voltage drop per 5m run. Define minimum lumen output per meter at rated power. Put these numbers in writing, ideally in a quality agreement signed by both parties before production begins.
When both you and your supplier agree on measurable criteria, there is no room for interpretation. The strip either passes or it does not. This protects your brand and gives your supplier clear targets to hit.
Third-Party Testing
For high-value projects or new supplier relationships, consider sending samples to an independent testing lab. Labs like TÜV, Intertek, or SGS can verify lumen output, color accuracy, thermal performance, and electrical safety. A third-party report gives you data you can trust and share with your own clients.
Conclusion
LED strip brightness loss is never caused by one thing alone. It is heat, chip quality, PCB design, power delivery, and environment working together. Understand each factor, demand proper QC from your supplier, and your projects will stay bright for years.
Footnotes
- Highlights how aluminum heat sinks effectively dissipate heat to extend LED lifespan. ↩︎
- Provides a general definition and overview of LED strip lights. ↩︎
- Explains the LED junction as the active region where light is generated and heat concentrates. ↩︎
- Defines L70 as an industry standard for measuring LED lumen maintenance over time. ↩︎
- Defines lumen depreciation as the gradual decrease in light output over time. ↩︎
- Explains the importance of thermal management for LED performance and lifespan. ↩︎
- Explains voltage drop as the reduction in electrical potential due to resistance. ↩︎
- Provides a general overview of printed circuit boards, including copper traces and their importance. ↩︎
- Provides the official definition and explanation of IP ratings, including IP67 and IP68. ↩︎
- Explains the process of photodegradation caused by ultraviolet radiation on materials. ↩︎


