los contratistas y distribuidores suelen hacernos la misma pregunta: ¿COB o SMD?
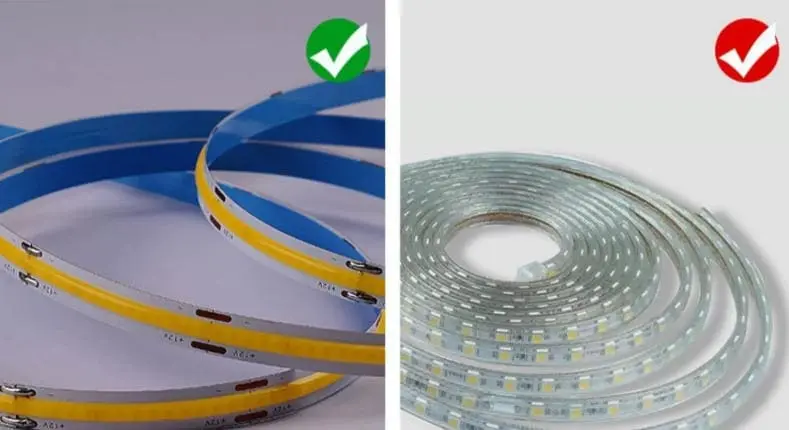
Las tiras LED COB (Chip on Board) incorporan cientos de pequeños chips bajo una sola capa de fósforo para producir una luz continua, sin puntos, mientras que las tiras SMD (Dispositivo de Montaje en Superficie) colocan chips LED individuales a intervalos, creando una iluminación visible de fuente puntual. Las dos tecnologías difieren significativamente en uniformidad de la luz, gestión del calor, costo, reparabilidad y escenarios de aplicación ideales.
Ambos tipos de empaquetado han ganado su lugar en la iluminación moderna las tiras LED COB (Chip on Board) 1. La elección correcta depende de los objetivos de tu proyecto, tu presupuesto y cuánto control necesitas sobre el resultado visual final. A continuación, desglosamos cada diferencia crítica para que puedas tomar una decisión de compra confiada.
¿Cómo puedo decidir entre COB y SMD para asegurar que mi proyecto de iluminación tenga cero puntos visibles?
Las puntos LED visibles son la queja número uno que escuchamos de los diseñadores de iluminación que especifican tiras para aplicaciones expuestas de moldura o bajo rieles Tiras SMD (Dispositivo de Montaje en Superficie) 2.
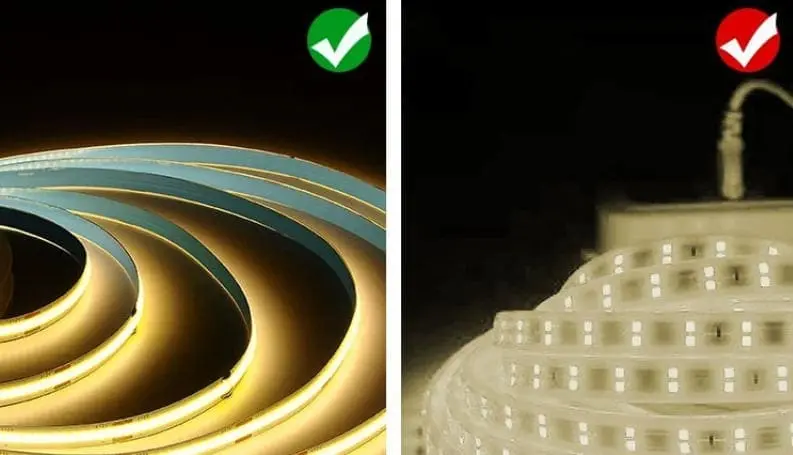
Para eliminar las manchas visibles, elige tiras LED COB. Su capa continua de fósforo fusiona la luz de los chips densamente empaquetados en un resplandor uniforme y sin puntos individuales. Las tiras SMD muestran puntos brillantes distintos entre los chips, por lo que requieren canales difusores o perfiles empotrados para reducir las manchas en instalaciones expuestas.
Por qué las tiras SMD muestran puntos
Las tiras SMD utilizan paquetes LED discretos — modelos como 2835, 3528 o 5050 — soldados en una tarjeta de circuito impreso flexible 3 a intervalos regulares. La separación entre cada chip crea una zona oscura. Cuando miras la tira desde una distancia de visión normal, ves un patrón repetido de puntos brillantes y espacios oscuros Elipsoide de MacAdam para clasificación 4. Esto es lo que la industria llama "manchas" o "puntos calientes"."
La gravedad de las manchas depende de dos factores: densidad de chips y distancia de visión. Una tira con 60 LED por metro parece mucho más manchada que una con 120 LED por metro. Pero incluso a 120 LED/m, los puntos individuales siguen siendo visibles cuando la tira está montada en un canal abierto sin difusor esmerilado.
Por qué las tiras COB eliminan los puntos
La tecnología COB invierte el enfoque. En lugar de montar paquetes LED terminados, nuestros ingenieros unen cientos de dies LED desnudos directamente en el sustrato de PCB 5 y luego recubre toda la matriz con una sola capa de fósforo. El resultado es una superficie continua que emite luz. No hay espacios, zonas oscuras ni puntos visibles, incluso sin un difusor.
En nuestro laboratorio de pruebas, comparamos rutinariamente tiras COB y SMD lado a lado a una distancia de visualización de 0,5 metros. La tira COB parece una banda sólida de luz. La tira SMD, incluso a 120 LEDs/m, muestra puntos individuales claros.
El ángulo de haz también importa
La detección no solo se trata de la densidad de chips. El ángulo de haz juega un papel. Las tiras COB emiten luz generalmente en unos 180 grados, lo que significa que la luz se dispersa ampliamente y se mezcla rápidamente. Las tiras SMD suelen estar alrededor de 120 grados, concentrando la luz en un cono más estrecho y haciendo que cada punto sea más pronunciado.
| Característica | Tira COB | Tira SMD (2835/5050) |
|---|---|---|
| Puntos LED visibles | No | Sí |
| Ángulo de haz típico | ~180° | ~120° |
| Se requiere difusor para un aspecto sin puntos | No | Sí |
| Densidad de LED recomendada para la mejor uniformidad | 480–528 LEDs/m | 120–240 LEDs/m |
| Ideal para montaje expuesto | Sí | Solo con perfil esmerilado |
Marco de decisión práctico
Si la tira será visible para el usuario final — piensa en estantes flotantes, molduras de escaleras, pasamanos de vidrio o detalles de cove abiertos — COB es la opción más segura. Si la tira estará oculta dentro de un canal de aluminio profundo con un difusor esmerilado pesado, SMD puede funcionar bien y puede ahorrar presupuesto. La clave es adaptar la tecnología al contexto de instalación.
Por nuestra experiencia suministrando a contratistas en España y en otros países, la tendencia es clara: cualquier proyecto donde la tira esté incluso parcialmente expuesta ahora predetermina a COB. La diferencia estética es simplemente demasiado obvia para ignorarla.
¿Qué tipo de embalaje de LED ofrece la mejor durabilidad y flexibilidad para mis instalaciones comerciales de alta gama?
Los contratistas con los que trabajamos en España suelen instalar tiras en locales de hostelería — bares, vestíbulos de hoteles, escaparates — donde las tiras deben soportar años de uso continuo.
Para instalaciones comerciales de alta gama, las tiras COB ofrecen una durabilidad superior porque su disposición densa de chips distribuye la estrés mecánico de manera uniforme, reduciendo la fatiga en las conexiones de soldadura durante la flexión y la instalación. Las tiras SMD ofrecen más opciones de reparación individual, pero tienen puntos de fallo concentrados en cada unión de soldadura. Ambos tipos necesitan perfiles de aluminio de calidad y una gestión térmica adecuada para maximizar la vida útil en entornos comerciales exigentes.

Distribución del Estrés Mecánico
Cuando doblas una tira alrededor de una curva — por ejemplo, envolviéndola a lo largo de un mamparo curvado o un recodo de radio — cada chip y unión de soldadura absorbe la tensión. En una tira SMD, cada paquete de LED discreto se apoya en dos o más pads de soldadura. Estos pads son el eslabón más débil. La flexión repetida o las vibraciones pueden agrietar una unión, matando ese LED individual y dejando una mancha oscura en tu instalación.
Las tiras COB manejan la flexión de manera diferente. Debido a que los chips son pequeños y están empaquetados en una fila continua, la tensión se comparte entre muchos puntos en lugar de concentrarse en unos pocos. Hemos doblado tiras COB alrededor de curvas con radio de 20 mm en nuestro laboratorio sin fallos en los chips. La misma prueba en tiras estándar SMD 5050 produjo grietas en las soldaduras en aproximadamente la mitad de las muestras.
Calor y Vida Útil
El calor es el enemigo silencioso de la longevidad de los LED. Tanto las tiras COB como las SMD generan calor. La diferencia está en cómo lo gestionan.
Las tiras SMD crean calor localizado en cada chip. Si un chip se calienta más que sus vecinos — debido a una ligera variación en la soldadura o bloqueo del flujo de aire — se degrada más rápido y cambia en temperatura de color con el tiempo. Esto crea un envejecimiento desigual en toda la tira.
Las tiras COB distribuyen la carga térmica en toda la superficie del sustrato. La unión directa entre el chip y la PCB crea un camino de calor eficiente. Cuando se combina con un extruido de aluminio de calidad, el calor se transfiere del chip al metal y al aire en una ruta corta y directa. Por eso, las tiras COB bien fabricadas alcanzan regularmente más de 50,000 horas de vida útil nominal.
Compensación en Reparaciones
Aquí es donde la SMD tiene una ventaja honesta. Si un LED individual falla en una tira SMD, un técnico experto puede desoldar y reemplazar ese chip. En una tira COB, la capa continua de fósforo hace que la reparación puntual sea casi imposible. En su lugar, se reemplaza todo el segmento.
Para proyectos comerciales, sin embargo, esta compensación rara vez importa en la práctica. La mayoría de los contratistas prefieren cambiar un segmento completo rápidamente en lugar de dedicar horas de trabajo a micro-soldar un solo chip. Y si la tira COB está bien fabricada desde el principio — buen diseño térmico, chips de calidad, corriente adecuada — la falla de un chip individual es extremadamente rara.
| Factor de Durabilidad | Tira COB | Tira SMD |
|---|---|---|
| Distribución del estrés durante la flexión | Incluso a lo largo de toda la matriz de chips | Concentrado en puntos individuales las conexiones de soldadura 7 |
| Radio mínimo de curvatura segura | ~15–20 mm | ~30–50 mm (varía según el modelo) |
| Vida útil típica nominal | Más de 50.000 horas | 30.000–50.000 horas |
| Posible reparación puntual | No (reemplazar segmento) | Sí (desoldar un solo chip) |
| Riesgo de fallo de punto único visible para el usuario final | Muy bajo | Moderado |
| Recomendado para curvas cerradas | Sí | Con precaución |
Qué significa realmente "Flexibilidad"
Algunas fuentes describen las tiras SMD como "más flexibles". Eso puede ser engañoso. Las tiras SMD pueden doblarse más libremente porque la PCB entre los chips no está cargada. Pero "flexible" no significa "duradero bajo flexión". Las tiras COB se doblan menos dramáticamente pero sobreviven mejor a la flexión. Para instalaciones comerciales donde las tiras deben ajustarse a formas arquitectónicas y mantenerse en su lugar durante años, la durabilidad de COB bajo flexión es la métrica más importante.
En nuestra línea de producción, realizamos una prueba de doblez de 180 grados en cada lote. Las tiras COB pasan consistentemente sin defectos luminosos. Esto da confianza a nuestros clientes contratistas al instalar en geometrías complejas.
¿Cómo afectará la elección de COB en lugar de SMD a mis costos de adquisición y al retorno de inversión a largo plazo para mis clientes?
Las conversaciones sobre presupuesto surgen en cada cotización de proyecto. Cuando preparamos desglose de costos para distribuidores, el precio de etiqueta de COB siempre es más alto — pero la historia final es más matizada.
Las tiras LED COB cuestan entre 20 y 40 veces más por metro que las tiras SMD comparables debido a una mayor densidad de chips y fabricación avanzada. Sin embargo, COB reduce el costo total del proyecto al eliminar la necesidad de perfiles difusores pesados, reducir las llamadas de mantenimiento y extender los ciclos de reemplazo. En un ciclo de vida de instalación comercial de 5 años, COB a menudo ofrece un retorno de inversión más sólido a pesar del precio inicial más alto.
Desglose del costo inicial
El coste de la materia prima de una tira COB es más alto por una razón sencilla: estás empaquetando cientos de diodos LED más por metro en la placa, y el proceso de recubrimiento de fósforo es más complejo. En nuestras líneas, una tira COB de 24V a 480 LEDs/m en 4000K suele costar entre 20 y 35% más que una tira SMD 2835 de 24V a 120 LEDs/m con características similares. la salida de lúmenes 8.
Pero el coste inicial de la tira es solo un concepto en el presupuesto de un proyecto. También debes tener en cuenta perfiles, difusores, drivers, mano de obra y mantenimiento a largo plazo.
Ahorros ocultos con COB
Debido a que las tiras COB lucen limpias sin un difusor, muchos diseñadores especifican un canal de aluminio simple con lente abierta o transparente en lugar de un perfil con acabado esmerilado profundo. Un perfil con difusor esmerilado puede costar entre 30 y 50% más que un canal abierto delgado. En un proyecto grande con cientos de metros de tira, ese ahorro en perfiles puede compensar o incluso superar la prima de precio de COB.
La mano de obra también disminuye. Los instaladores dedican menos tiempo a alinear las lentes difusoras y a verificar patrones de puntos visibles a través de la cubierta. Nuestro socio de distribución en España reportó una reducción de 15% en las horas de mano de obra para la instalación tras cambiar su especificación estándar de SMD a COB para aplicaciones expuestas.
Retorno de inversión en energía y mantenimiento
Las tiras COB generalmente alcanzan más de 80 lúmenes por vatio. Las tiras SMD de calidad varían de 50 a 100 lúmenes por vatio dependiendo del modelo de chip. En un proyecto de pasillo de hotel de 500 metros que funciona 12 horas al día, incluso una ventaja de eficiencia del 10% se traduce en ahorros energéticos significativos en cinco años.
El mantenimiento es donde el argumento del retorno de inversión se fortalece. Las tiras COB con un montaje adecuado gestión térmica 9 rara vez presentan fallos en un solo chip o desplazamiento de color. Las tiras SMD, especialmente las de menor calidad, pueden desarrollar LEDs muertos o un cambio de color notable después de 15,000 a 20,000 horas. Cada llamada de servicio para reemplazar un segmento de tira en un techo acabado cuesta mucho más que la propia tira.
| Factor de Costo | Tira COB | Tira SMD |
|---|---|---|
| Costo de la tira por metro (rendimiento lumínico comparable) | Mayor (prima del 20 al 40%) | Menor (línea base) |
| Costo del perfil/difusor | Menor (el canal abierto suele ser suficiente) | Mayor (se necesita difusor esmerilado para un aspecto sin puntos) |
| Mano de obra para la instalación | Menor (sin alineación de difusor, sin verificación de puntos) | Más alto |
| Costo energético (por 1,000 horas con lúmenes iguales) | Menor (más de 80 lm/W típico) | Moderado (50–100 lm/W varía según el chip) |
| Llamadas de mantenimiento en más de 5 años | Menos | Más (fallos en LED único, deriva de color) |
| Costo total de propiedad (ciclo de 5 años) | A menudo menor | A menudo mayor a pesar del precio más barato de la tira |
Cuando SMD sigue siendo una opción rentable
SMD es la opción correcta cuando la tira estará completamente oculta, cuando el proyecto es a corto plazo o temporal, o cuando el cliente necesita efectos de píxeles RGB o direccionables que COB aún no soporta bien. Para iluminación de eventos, retail emergente o instalaciones decorativas de ambiente, el menor precio de entrada y las opciones de color más amplias del SMD ganan en valor.
La conclusión: el precio por metro no es el costo por proyecto. Siempre alentamos a nuestros socios de compras a calcular el costo total instalado antes de tomar una decisión tecnológica.
¿Puedo mantener una consistencia estricta de color en diferentes lotes si cambio mi marca privada a tecnología COB?
La consistencia del color es el problema que mantiene despiertos a los propietarios de marcas privadas. Uno de nuestros socios a largo plazo en España rechazó un envío completo porque una deriva de temperatura de color de 50K entre lotes era visible cuando las tiras viejas y nuevas se encontraban en una unión.
Sí, la tecnología COB puede ofrecer una estricta consistencia de color de lote a lote — pero solo si el fabricante controla la clasificación, la mezcla de fósforo y la calibración de corriente en cada etapa. La capa continua de fósforo del COB ayuda a mezclar pequeñas variaciones de color a nivel de chip, dándole una ventaja natural sobre las tiras SMD donde las diferencias entre chips son visibles. La clave es trabajar con un proveedor que aplique una clasificación estricta de MacAdam, idealmente de 3 pasos o más ajustada.
Por qué la consistencia del color es más difícil de lo que parece
Los chips LED no son perfectamente idénticos. Cada oblea produce chips con ligeras variaciones en longitud de onda y brillo. Los fabricantes clasifican estos chips en "categorías" según sus coordenadas de color medidas. Cuanto más estricta sea la clasificación, más consistente será el producto final — y más costoso será el proceso de clasificación.
Para las tiras SMD, cada paquete de LED es su propia fuente de luz. Si dos paquetes adyacentes provienen de diferentes categorías, la diferencia de color es visible a simple vista. Esto es especialmente problemático en instalaciones de larga duración donde las tiras de diferentes lotes de producción se unen de extremo a extremo.
Ventaja de mezcla natural del COB
La tecnología COB tiene una ventaja incorporada aquí. Debido a que cientos de matrices se colocan debajo de una sola capa de fósforo, las pequeñas diferencias de color de chip a chip se promedian por el fósforo. El resultado es una salida más uniforme de la tira en sí. Piénsalo como mezclar pintura: las partículas de pigmento individuales pueden variar, pero el color mezclado en la pared parece uniforme.
Sin embargo — y esto es fundamental — esa mezcla solo funciona dentro de una misma tira. Entre lotes, la formulación del fósforo, el grosor de la capa y las condiciones de curado deben ser controlados estrictamente. Si la mezcla de fósforo cambia entre lotes de producción, el color de un lote a otro se desplazará independientemente del agrupamiento de las matrices.
Lo que hacemos para mantener el color preciso
En nuestra línea de producción, aplicamos varios controles:
- Agrupamiento de matrices: Compramos matrices dentro de una elipse MacAdam de 3 pasos. Esto significa que la variación de color es imperceptible para la mayoría de los ojos humanos.
- Control del fósforo: Mezclamos fósforo en lotes controlados y probamos cada mezcla contra un estándar de referencia antes de recubrir.
- Pruebas espectrales en línea: Cada carrete se prueba con un espectrofotómetro. Registramos la temperatura de color correlacionada (CCT), el índice de reproducción cromática (CRI) y coordenadas de cromaticidad 10 y las comparamos con las especificaciones del pedido.
- Retención de muestras de referencia: Guardamos una muestra sellada de cada lote para que futuros pedidos puedan ser comparados visual e instrumentalmente.
Qué preguntar a su proveedor
Si estás considerando cambiar tu etiqueta privada de SMD a COB, hazle estas preguntas a tu proveedor:
- ¿Qué agrupamiento de pasos MacAdam utilizan para las matrices COB?
- ¿Cómo controlan la consistencia del lote de fósforo?
- ¿Pueden proporcionar informes de pruebas espectrales por carrete?
- ¿Retienen muestras de referencia para la comparación en reordenes?
- ¿Cuál es tu rango de tolerancia para CCT y CRI en diferentes lotes?
Si no pueden responder claramente, la tecnología por sí sola no te salvará. COB facilita la consistencia, pero no la hace automática. La disciplina de fabricación detrás del COB importa tanto como el propio COB.
Esta es realmente la idea central: el COB no es automáticamente mejor. Una tira de COB bien hecha es mejor. Una mal fabricada concentra todos sus problemas — calor, deriva de color, fallo prematuro — en una superficie continua donde los defectos son imposibles de ocultar. La calidad del fabricante es la variable que inclina la balanza.
Conclusión
El COB y el SMD resuelven problemas diferentes. Combina la tecnología con el proyecto — las instalaciones expuestas favorecen el COB, las instalaciones ocultas o dinámicas favorecen el SMD. El control de calidad del fabricante importa más que solo el tipo de embalaje.
Notas al pie
- Explica la tecnología de las tiras de LED COB y sus características. ↩︎
- Describe la tecnología de las tiras de LED SMD y sus características. ↩︎
- Reemplazó el enlace 404 con una explicación detallada de las PCBs flexibles. ↩︎
- Explica un método para garantizar la consistencia del color de los LED. ↩︎
- Explica el material base para la unión de los chips de LED y la disipación de calor. ↩︎
- Define una propiedad óptica clave de las tiras de LED que afecta la dispersión de la luz. ↩︎
- Identifica un punto común de fallo en la durabilidad de las tiras de LED. ↩︎
- Reemplazó el enlace 404 con un artículo completo sobre lúmenes en el diseño de iluminación. ↩︎
- Crucial para la longevidad, el rendimiento y la estabilidad del color de los LED. ↩︎
- Reemplazó el enlace 404 con una explicación autorizada de las coordenadas de cromaticidad en Wikipedia. ↩︎


