
On production line, we see the same pattern: a contractor orders beautiful LED strips, but the installation fails because the wrong accessories were paired with them LED strip light accessories 1. The strips themselves are only half the equation. Without the right power supply, connectors, profiles, and controllers, even the best LED strip will underperform, overheat, or simply look unprofessional.
The most common LED strip light accessories include power supplies, solderless connectors, aluminum mounting profiles, controllers and dimmers, extension wires, mounting clips, and waterproofing components. Each accessory solves a specific installation problem — from delivering safe voltage to managing heat, eliminating visible joints, and enabling color or brightness control.
This guide breaks down each accessory category by the problem it solves solderless clip-on connectors 2. Whether you are a contractor planning a long-run commercial installation or a distributor building a private-label kit, understanding these components will save you time, reduce callbacks, and produce a cleaner result. Let's walk through each one.
How do I choose the right power supply for my long-run LED strip project?
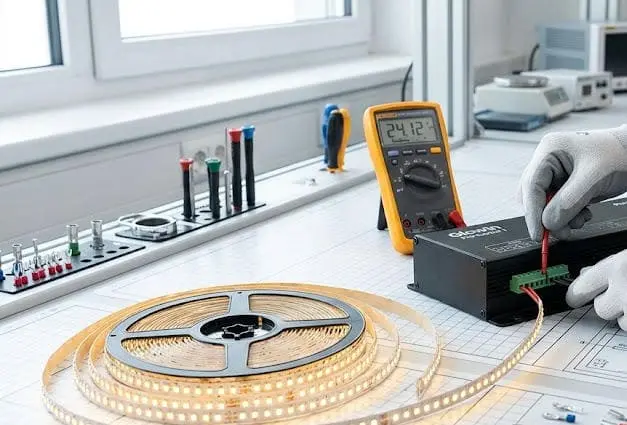
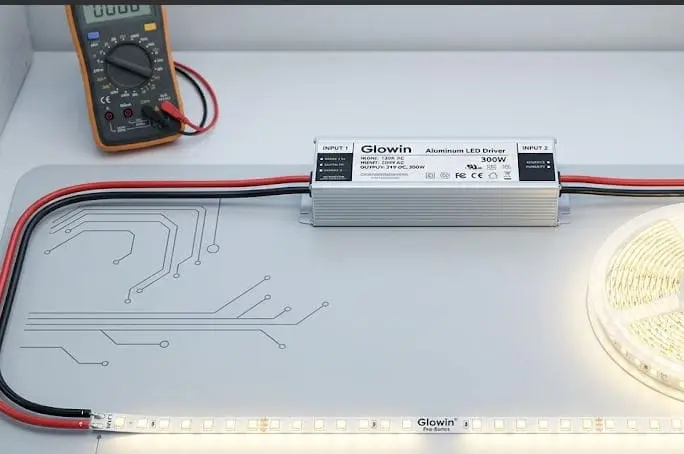
We have shipped LED strip systems to projects in Germany and Australia where the strips arrived in perfect condition — but the power supply was undersized or incompatible. The result was flickering, dimming at the far end, or even strip failure within weeks. Power supply selection 3 is not a minor detail. It is the foundation of every reliable LED installation.
To choose the right power supply, match the output voltage (12V or 24V DC) to your strip's rated voltage, then calculate total wattage by multiplying strip wattage per meter by total length, and add a 20% safety margin. Also consider the IP rating, form factor, and whether the driver needs to be dimmable.
Voltage Matching Comes First
The most basic rule is this: your power supply output voltage must match your LED strip input voltage. A 12V strip needs a 12V driver. A 24V strip needs a 24V driver. Mixing these will either burn out the strip or leave it too dim to be useful. In our experience shipping to Australian contractors, 24V systems are increasingly preferred for long-run projects because they allow longer single runs with less voltage drop 4.
Calculating Wattage Correctly
Once voltage is matched, calculate the total wattage. Multiply the wattage per meter of your strip by the total length you plan to install. Then add at least 20% headroom. Running a power supply at full load shortens its life and generates more heat. Here is a quick reference:
| Strip Power (W/m) | Run Length (m) | Strip Total (W) | 20% Margin | Recommended PSU (W) |
|---|---|---|---|---|
| 4.8 | 10 | 48 | 9.6 | 60 |
| 9.6 | 10 | 96 | 19.2 | 120 |
| 14.4 | 15 | 216 | 43.2 | 260 |
| 19.2 | 20 | 384 | 76.8 | 480 |
Form Factor and Environment
Power supplies come in different shapes: plug-in adapters for small residential jobs, enclosed metal cases for commercial installs, and slim or waterproof models for tight spaces or outdoor use. If the project is outdoors or in a wet area, choose a driver rated IP65 or higher. IP rating 5 For indoor ceiling coves, a standard IP20 enclosed driver works fine.
Dimmable vs. Non-Dimmable Drivers
If your client wants dimming — and most commercial projects do — you need a dimmable driver that supports the dimming protocol 6 used by the controller. Common protocols include 0-10V, DALI, PWM, and TRIAC (phase-cut). In our export projects, we always ask contractors to confirm the dimming protocol before we ship, because a mismatch here creates callbacks.
Splitting Power on Long Runs
For runs longer than 10 meters on 24V strips (or 5 meters on 12V strips), voltage drop becomes a real issue. The LEDs at the far end appear dimmer. The solution is to either power-inject at both ends or use multiple power supplies. Splitter cables can divide one driver's output into two or three separate strip runs, distributing current more evenly.
What connectors should I use to avoid light discontinuity at the joints?
One of the most common complaints we hear from distributors and contractors is this: "The strips work fine individually, but where they join, there's a dark spot or the connection keeps failing." This is almost always a connector problem. The wrong connector type, size, or pin count creates resistance, poor contact, or physical gaps that show up as visible discontinuities in the light output.
To avoid light discontinuity at joints, use solderless clip-on connectors matched to your strip's width and pin count for direct splices, jumper connectors with short cables to bridge corners or gaps, and pigtail connectors to link strips to power sources. Always verify that the connector matches the strip's voltage, width, and IP rating.
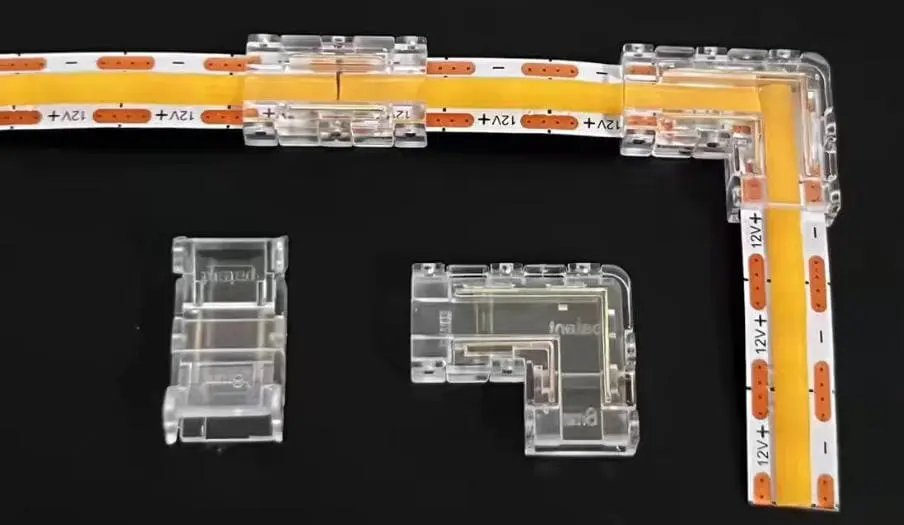
Understanding Connector Types by Function
Not all connectors do the same job. Here is a breakdown of the main types:
| Connector Type | Function | Best Use Case |
|---|---|---|
| Splice (strip-to-strip) | Joins two strip ends directly | Extending a straight run |
| Jumper (with cable) | Bridges a gap between two strip sections | Navigating corners or cabinet breaks |
| Pigtail (strip-to-wire) | Adds wire leads to a strip end | Connecting strip to power supply or controller |
| Wire-to-wire | Joins two cable ends | Extending wiring between components |
| Splitter | Divides one output to multiple strips | Feeding multiple runs from a single driver |
Pin Count Must Match Your Strip Type
This is where many buyers make mistakes. Single-color strips use 2-pin connectors. Tunable white strips use 3-pin. RGB strips use 4-pin. RGBW strips use 5-pin. These are not interchangeable. If you use a 4-pin connector on a 5-pin RGBW strip, the white channel simply will not work.
Strip Width Matters
LED strips come in 8mm, 10mm, and 12mm widths. The connector must match. A 10mm connector will not grip an 8mm strip properly, leading to intermittent contact and flickering. When we prepare accessory kits for our OEM customers, we always confirm strip width before including connectors.
Solderless vs. Soldered Connections
Solderless connectors are fast and easy. They are ideal for residential jobs, quick prototypes, and installations where speed matters. But for permanent commercial projects — especially long-run cove lighting or outdoor installations — soldered connections are more reliable. Solder joints have lower resistance and are less likely to corrode or loosen over time. Many of our contractor clients in Germany prefer soldered connections for high-end architectural projects, while using solderless connectors for display or retail environments where future reconfiguration is expected.
Avoiding Dark Spots at Joints
Dark spots at joints happen for two reasons: physical gaps and electrical resistance. To fix physical gaps, use strip-to-strip splice connectors that butt the two strip ends as close together as possible. To reduce electrical resistance, ensure the connector's copper contact pads make full contact with the strip's solder pads. Clean the strip ends before insertion. Avoid bending the strip right at the connector — this pulls the pads apart.
Which aluminum profiles will best protect my strips and manage heat dissipation?
When we first started developing our project-grade LED strip systems, we treated aluminum profiles as optional accessories — nice to have, but not essential. We learned quickly that this was wrong. On a hospitality project in Australia, strips mounted without profiles developed color shift within a year because the adhesive-backed installation trapped heat against a wooden surface. Profiles are not decoration. They are thermal management tools.
Aluminum profiles (channels) protect LED strips from physical damage, provide structured mounting, and act as heat sinks that draw heat away from the LEDs. Choose surface-mount profiles for exposed installations, recessed profiles for flush-mounted designs, and corner profiles for 90-degree angles. Always pair profiles with compatible diffuser lenses for even light output.
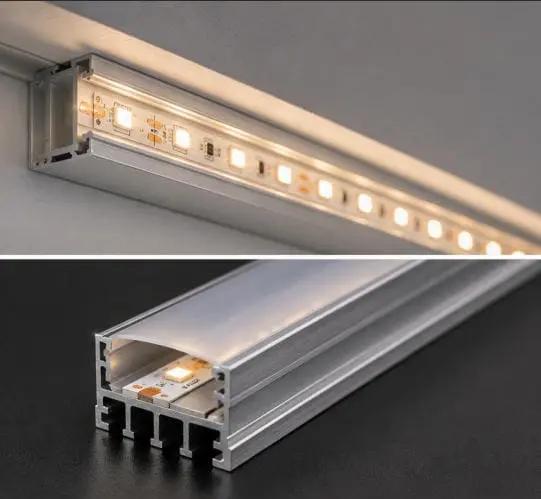
Why Heat Dissipation Matters
LEDs are solid-state devices. They do not burn out suddenly like incandescent bulbs. Instead, excessive heat gradually degrades their phosphor coatings, shifts their color temperature, and reduces their light output over thousands of hours. This is called lumen depreciation 7. Aluminum is an excellent thermal conductor. When an LED strip sits inside an aluminum profile, heat transfers from the strip's PCB into the aluminum body, which then radiates it into the surrounding air. This keeps the LED junction temperature lower and extends the strip's useful life.
Common Profile Types
| Profile Type | Mounting Style | Typical Application | Diffuser Option |
|---|---|---|---|
| Surface-mount | Screwed or adhered to flat surface | Under-cabinet, shelf lighting | Flat or frosted cover |
| Recessed | Embedded into a routed channel | Countertops, ceiling coves, stairs | Flush frosted lens |
| Corner (45°) | Mounted at 90° wall/ceiling junction | Cove lighting, display cases | Angled frosted lens |
| Pendant / Suspended | Hung from ceiling with cables | Linear pendant fixtures | Wrap-around diffuser |
| Flexible / Bendable | Curved to follow radius | Curved walls, arched features | Flexible frosted lens |
The Role of Diffuser Lenses
A bare LED strip inside a profile will still show individual LED dots, especially at close viewing distances. Diffuser lenses 8 solve this. A frosted or opal lens spreads the light evenly and eliminates hotspots. However, diffusers do reduce light output slightly — typically by 10–15% for a standard frosted lens. For projects where maximum brightness matters, a clear lens protects the strip without sacrificing output but does not diffuse.
End Caps and Waterproofing
Every profile should be finished with end caps. These protect exposed strip ends from dust, moisture, and accidental contact. For outdoor or wet-area installations such as bathroom vanities or kitchen undercabinets, sealed end caps combined with silicone gaskets provide IP65-level protection when paired with the right strip and profile combination.
Sizing the Profile to Your Strip
Profile width must accommodate your strip. Most standard profiles fit 10mm or 12mm strips. If you are using wider high-density strips (15mm or 20mm), you need wider profiles. At our facility, we always recommend that clients send strip samples before we finalize profile selection for a project order. A strip that sits loosely in a profile will not transfer heat efficiently, and one that is too wide simply will not fit.
Thermal Performance in Practice
In our testing, an LED strip rated at 14.4W/m running inside an aluminum profile operates approximately 10–15°C cooler at the LED junction compared to the same strip mounted directly on drywall with adhesive backing alone. That temperature difference can translate to years of additional service life.
How can I select the correct controllers to match my client's dimming requirements?
On more than one occasion, we have received urgent messages from buyers who purchased strips and controllers separately, only to discover they were incompatible. The strips were fine. The controller was fine. But they did not speak the same language. Choosing the right controller is not about picking the fanciest option — it is about matching the controller's protocol, channel count, and output capacity to the specific strip and driver in the system.
Select controllers based on three factors: the strip type (single-color, tunable white, RGB, RGBW, or addressable), the dimming protocol supported by your power supply (PWM, 0-10V, DALI, or TRIAC), and the total wattage or current the controller must handle. For smart-home integration, verify compatibility with the client's ecosystem such as Matter, Zigbee, or Wi-Fi.
Matching Controller to Strip Type
The most basic rule: the controller must support the number of channels your strip uses.
| Strip Type | Channels | Controller Type Needed |
|---|---|---|
| Single-color (warm white, cool white) | 1 | Single-channel dimmer |
| Dual white / Tunable white (CCT) | 2 | CCT controller |
| RGB | 3 | RGB controller |
| RGBW | 4 | RGBW controller |
| RGBCCT | 5 | 5-channel controller |
| Addressable (WS2812, SK6812) | Data + clock | SPI / pixel controller |
Using an RGB controller on an RGBW strip means the dedicated white channel will not be controllable. Using a single-channel dimmer on an RGB strip will only dim all channels together — no color mixing.
Understanding Dimming Protocols
This is where many projects hit problems. The dimming protocol is how the controller communicates with the power supply or directly with the strip.
PWM (Pulse Width Modulation) is the most common for low-voltage LED strips. The controller rapidly switches the power on and off to simulate dimming. It is simple, affordable, and works well for most residential and light commercial projects.
0-10V is a widely used commercial protocol. The controller sends a low-voltage signal (0 to 10 volts) to a compatible dimmable driver, which then adjusts the output. This is standard in many commercial building management systems.
DALI (Digital Addressable Lighting Interface) is a digital protocol used in high-end commercial and architectural projects. It allows individual addressing of fixtures, group control, and integration with building automation. DALI-compatible drivers and controllers cost more, but they offer precision and scalability that simpler systems cannot match.
TRIAC / Phase-cut dimming works with AC mains dimmers and is common in residential retrofit applications. It requires a TRIAC-compatible LED driver.
Wattage and Current Capacity
Every controller has a maximum output rating. If your total strip load exceeds the controller's capacity, you need either a higher-rated controller or signal amplifiers / repeaters. Amplifiers mirror the controller's signal and add their own power to drive additional strip sections. This is standard practice in long-run commercial installations where a single controller manages 30, 50, or even 100 meters of strip.
Smart Home and Wireless Control
More projects now require integration with smart home platforms 10. Wi-Fi and Bluetooth controllers are popular for residential use. For commercial buildings, Zigbee and the new Matter protocol offer reliable mesh networking. When we consult with our distributor clients on controller selection, we always ask about the end-user's ecosystem first. A beautiful RGBW installation is worthless if the controller cannot talk to the client's home automation hub.
A Practical Selection Workflow
Here is the process we recommend:
- Identify the strip type and channel count.
- Confirm the dimming protocol required by the project or the existing infrastructure.
- Calculate total strip wattage and ensure the controller (plus any amplifiers) can handle the load.
- Verify physical compatibility — connector type, voltage, and mounting method.
- If smart control is needed, confirm the wireless protocol matches the client's platform.
Following this sequence prevents the most common compatibility errors we see in the field.
Conclusion
Power supplies, connectors, aluminum profiles, and controllers — each accessory solves a specific problem. Skip one, and the entire installation suffers. Choose them as a system, not as afterthoughts, and your LED strip projects will perform reliably for years.
Footnotes
- Provides an overview of common LED strip light accessories. ↩︎
- Describes the function and use of solderless connectors. ↩︎
- This article provides a comprehensive guide on how to choose an LED power supply, covering voltage, wattage, dimming, and environmental factors. ↩︎
- Explains the phenomenon of voltage drop in LED strip installations. ↩︎
- Explains the importance of IP rating for environmental protection. ↩︎
- Explains the communication method between controllers and power supplies. ↩︎
- Wikipedia provides an authoritative definition and explanation of lumen depreciation in the context of LED lighting. ↩︎
- This article explains what a light diffuser is, why it's necessary, and its benefits, including enhanced light quality and glare reduction. ↩︎
- Explains how aluminum profiles aid in heat dissipation for LEDs. ↩︎
- Discusses the integration of LED lighting with smart home systems. ↩︎


