Every week on our production floor, we inspect thousands of meters of LED strip lighting 1 before shipment. One thing we notice again and again is how quickly even a thin layer of dust can dull an otherwise perfect strip. If you have ever looked up at your installed LED strips and noticed they seem dimmer or slightly uneven, dust is almost certainly the culprit.
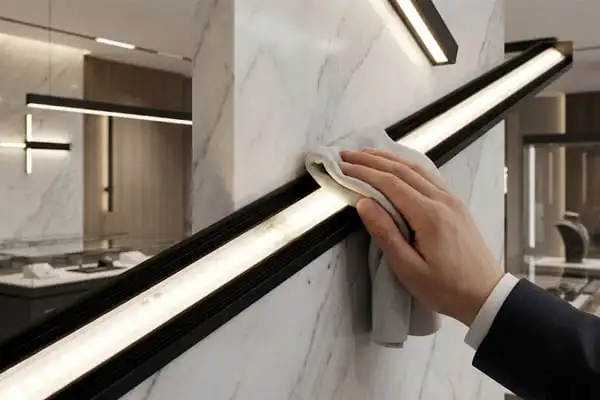
To properly clean dust from LED strip lights, always disconnect the power first. Use a dry microfiber cloth or soft brush to remove loose dust. For stubborn grime, lightly dampen the cloth with mild soap solution or 70% isopropyl alcohol, then dry everything completely before restoring power.
In this guide, I will walk you through the exact methods, tools, and precautions we recommend to our contractor and distributor partners HVAC filters 2. Whether your LED strips are installed in a cove ceiling, a kitchen cabinet, or an outdoor facade, the steps below will keep them looking and performing their best.
How can I safely remove dust from my installed LED strips without damaging the circuitry?
We have shipped LED strips to projects across Germany and Australia, and the number one maintenance question our partners ask is exactly this. Dust builds up quietly. By the time you notice it, brightness can already be down noticeably.
To safely remove dust, power off the strips and unplug the driver. Gently wipe the surface with a dry microfiber cloth or soft-bristled brush. Never scrub solder joints or connectors. For sticky residue, use a lightly damp cloth, then allow the strip to air-dry fully before reconnecting.
Why Dust Is More Than a Cosmetic Problem
Dust does more than make your lights look dirty. A layer of fine particles on the LED surface scatters the emitted light. This reduces effective lumen output 3. Over time, dust mixed with kitchen grease or humidity can form a film that is much harder to remove. In enclosed aluminum channels 4, dust can also trap heat. Excess heat shortens LED lifespan and can cause color shift 5. So regular dusting is not just about appearance. It is about protecting your investment.
Step-by-Step Safe Dusting Process
Here is the process we recommend based on what we have learned from years of testing and customer feedback:
- Turn off and unplug. This is non-negotiable. Even though LED strips run on low voltage (usually 12V or 24V), moisture plus live current can corrode solder pads and damage the driver.
- Dry dust first. Use a clean, dry microfiber cloth 6. Wipe gently along the length of the strip. Do not press down hard on individual LEDs or resistors.
- Use a soft brush for tight spots. A soft artist's brush or anti-static brush works well around connectors, solder points, and inside aluminum channels.
- Compressed air for crevices. Hold the can at least 15 cm away. Short bursts are better than a steady stream, which can push dust deeper or dislodge adhesive.
- Inspect while you clean. Look for peeling adhesive, discolored LEDs, or loose connectors. Catching these early saves a lot of trouble later.
- Power back on only when dry. If you used any moisture at all, wait at least 30 minutes.
Common Mistakes That Damage LED Strips
| Mistake | Why It Causes Damage | What to Do Instead |
|---|---|---|
| Cleaning while powered on | Risk of short circuit and corrosion | Always disconnect power first |
| Using paper towels | Abrasive fibers scratch LED lenses and coatings | Use microfiber cloth or soft brush |
| Spraying cleaner directly onto strips | Liquid seeps into solder joints and connectors | Spray onto the cloth, then wipe |
| Scrubbing solder joints | Can crack or detach component connections | Use a cotton swab with gentle pressure |
| Using bleach or ammonia-based cleaners | Corrodes copper traces and damages silicone coatings | Use mild soap or 70% isopropyl alcohol 7 |
Taking a gentle, methodical approach protects the circuitry and keeps your strips running at full brightness for years.
What cleaning tools and solutions are safe for me to use on high-end LED components?
When we develop and test LED strips in our lab, we are very particular about what touches the surface. High-end LEDs with tight color bins and premium phosphor coatings are sensitive to chemical exposure. The wrong cleaner can cloud a lens or degrade a silicone jacket in a single wipe.
Safe tools include microfiber cloths, soft-bristled brushes, anti-static brushes, compressed air, and cotton swabs. Safe solutions include distilled water, mild dish soap diluted in water, and 70% isopropyl alcohol. Avoid bleach, ammonia, acetone, and any abrasive pads or scouring agents.
Recommended Cleaning Tools
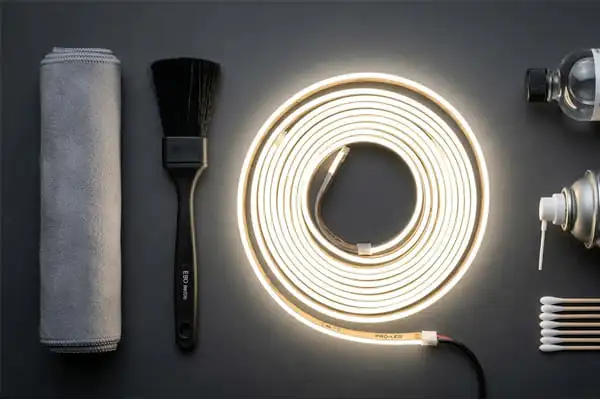
Not all cloths and brushes are equal. Here is a breakdown of the tools we suggest and why each one works well.
- Microfiber cloth. The best all-around tool. Microfiber traps dust particles instead of pushing them around. Use it dry for routine dusting. Slightly dampen it for tougher spots.
- Soft artist's brush. Ideal for getting into aluminum extrusion channels and around solder pads. A brush with natural or synthetic soft bristles will not scratch.
- Anti-static brush. LED strips can carry a slight static charge that attracts dust. An anti-static brush neutralizes this charge as it cleans, which slows dust re-accumulation.
- Compressed air. Great for removing dust from connectors and between closely spaced LEDs. Keep the can upright and maintain distance to avoid propelling liquid propellant onto the strip.
- Cotton swabs. Perfect for spot-cleaning individual connectors or stubborn marks on a single LED. Dip in isopropyl alcohol and squeeze out the excess before applying.
Safe vs. Unsafe Cleaning Solutions
| Solution | Safe? | Notes |
|---|---|---|
| Distilled water (lightly dampened cloth) | Yes | Best for general damp wiping; leaves no mineral residue |
| Mild dish soap + water (diluted) | Yes | Effective for kitchen grease; rinse residue with a clean damp cloth |
| 70% isopropyl alcohol | Yes | Good for sticky residue and greasy marks; evaporates quickly |
| Glass cleaner (ammonia-based) | No | Ammonia degrades silicone coatings and attacks copper traces |
| Acetone / nail polish remover | No | Dissolves plastic lenses and protective coatings almost instantly |
| Bleach / chlorine-based cleaners | No | Highly corrosive to metals and adhesives |
| WD-40 or other petroleum-based sprays | No | Leaves oily film that attracts more dust and can soften adhesives |
A Note on Isopropyl Alcohol Concentration
We recommend 70% IPA rather than 90% or 99%. The 70% formulation actually cleans better for general grime because the higher water content helps dissolve a wider range of residues. It also evaporates a bit slower, giving you more working time. However, if you are in a very humid environment or cleaning a non-waterproof strip, use 90% IPA to minimize moisture exposure. In either case, apply the alcohol to the cloth or swab, never directly onto the strip.
How Much Moisture Is Too Much?
The rule is simple: damp, not wet. If you squeeze the cloth and water drips out, it is too wet. You want just enough moisture to pick up grime without leaving visible wetness behind. After wiping, the surface should feel dry to the touch within a few seconds. If it does not, you used too much liquid.
How do I maintain my project-grade lighting to prevent dust from affecting brightness and color consistency?
In our experience supplying project-grade strips to contractors, the biggest regret buyers express is not setting up a maintenance schedule from day one. A strip that delivers perfect 3000K warm white on install day can look noticeably different six months later if dust is allowed to accumulate.
Prevent dust-related brightness and color issues by establishing a regular cleaning schedule, using aluminum channels with diffuser covers, keeping nearby air vents clean, and inspecting adhesive and connectors periodically. Routine maintenance every two to four weeks preserves performance and extends strip lifespan significantly.
Setting a Cleaning Schedule
How often you clean depends on the installation environment. A strip inside a sealed aluminum profile in a bedroom needs far less attention than one mounted under kitchen cabinets near a stove. Here is a general guide:
| Environment | Recommended Cleaning Frequency | Primary Contaminant |
|---|---|---|
| Bedroom or living room cove | Every 4–6 weeks | Fine household dust |
| Kitchen under-cabinet | Every 2 weeks | Grease, cooking particulates |
| Workshop or garage | Every 1–2 weeks | Wood dust, metal filings, oil mist |
| Outdoor facade or soffit | Monthly (weather permitting) | Pollen, dirt, insect residue |
| Bathroom or spa area | Every 3–4 weeks | Humidity residue, soap film |
| Retail display or hospitality | Every 2–3 weeks | Fingerprints, airborne lint |
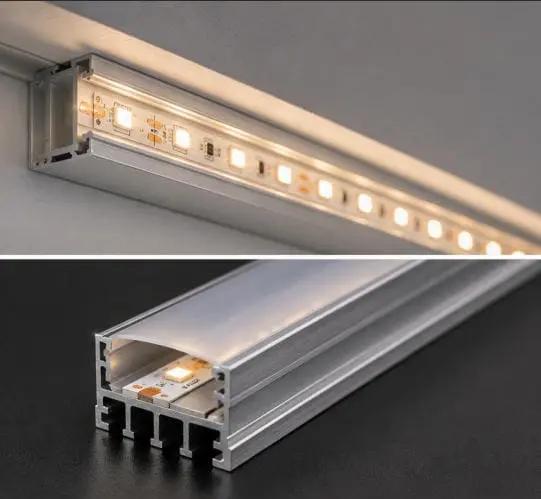
Use Aluminum Channels and Diffusers as Dust Shields
One of the best preventive measures is to mount LED strips inside aluminum extrusion profiles with snap-on diffuser covers. The diffuser serves multiple purposes: it spreads the light evenly, eliminates LED dot visibility, and physically shields the strip from airborne dust and debris. When it is time to clean, you simply remove the diffuser, wipe it down, and snap it back on. The strip itself stays much cleaner underneath.
We often recommend this to our partners in Australia and Germany where project specifications demand consistent visual quality over years of use. A channel-and-diffuser setup can cut your cleaning frequency roughly in half compared to an exposed strip.
Keep the Surrounding Area Clean
Dust on LED strips does not appear from nowhere. It comes from the environment. A few smart habits make a big difference:
- Clean or replace HVAC filters regularly. Dirty filters push more dust into the room.
- Wipe down nearby shelves and surfaces when you clean the strips. Otherwise, dust simply migrates back.
- Use an air purifier in rooms with heavy dust production, like workshops.
- Seal cable entry points. Gaps around wiring entries can funnel dust directly onto strips.
Inspect Adhesive and Connectors During Cleaning
Cleaning time is also inspection time. When you have the power off and you are running a cloth along the strip, look for these warning signs:
- Peeling adhesive. If the 3M tape backing is losing grip, the strip may sag into pockets where dust collects faster. Reattach with VHB tape or mounting clips.
- Discolored or dim LEDs. If a section stays dim after cleaning, the problem is electrical, not dust. Check the solder joint and the connector at that segment.
- Corroded connectors. Green or white buildup on metal connectors means moisture has been present. Clean with IPA and a cotton swab. Consider upgrading to soldered connections or waterproof connectors.
The Link Between Dust, Heat, and Color Shift
Dust acts as an insulating blanket. LEDs generate heat during operation, and aluminum channels are designed to dissipate that heat. When dust fills the channel, thermal performance drops. Higher junction temperatures cause LEDs to shift warmer in color and reduce in brightness. In severe cases, this accelerates phosphor degradation 8. Keeping the channel clean is directly tied to maintaining the color consistency that high-end projects demand.
Does the IP rating of my LED strips change the way I should clean them?
When our engineering team designs strips across the full IP range, from bare-board IP20 9 to fully potted IP68, the construction differences are significant. Those differences directly affect how much moisture and handling the strip can tolerate during cleaning.
Yes, the IP rating significantly affects your cleaning method. IP20 strips with exposed circuitry require strictly dry or barely damp cleaning. IP65 and IP67 strips with silicone sleeves or coatings tolerate a damp cloth more safely. IP68 strips can handle gentle rinsing, but all types must be fully dry before reconnecting to power.
Understanding IP Ratings in Practical Terms
IP stands for Ingress Protection 10. The two digits indicate protection against solids (first digit) and liquids (second digit). For LED strips, the most common ratings you will encounter are IP20, IP54, IP65, IP67, and IP68. Here is what each means for cleaning:
- IP20 — No protection against water. The circuit board, resistors, and LED lenses are fully exposed. Even a slightly damp cloth poses risk if moisture reaches solder joints or resistor pads.
- IP54 — Limited splash protection. Typically achieved with a light nano-coating. You can use a damp cloth with more confidence, but do not let water pool on the surface.
- IP65 — Protected against water jets from any direction. Usually achieved with a silicone sleeve or a top-side silicone coating. A damp cloth is fine. You can even use a mildly soapy damp cloth without much worry.
- IP67 — Can be briefly immersed in water up to 1 meter. These strips are usually encased in a silicone tube. You can wipe them down thoroughly with a damp cloth or even rinse the outer surface gently.
- IP68 — Continuous submersion rated. Fully potted or encased. These can be rinsed under running water, though there is no reason to soak them.
Cleaning Method by IP Rating
| IP Rating | Dry Cloth | Damp Cloth | Mild Soap Solution | Rinse Under Water | Key Caution |
|---|---|---|---|---|---|
| IP20 | Yes | Very lightly | Not recommended | No | Keep moisture away from exposed pads |
| IP54 | Yes | Yes | Lightly | No | Avoid pooling water on surface |
| IP65 | Yes | Yes | Yes | No | Do not submerge; wipe only |
| IP67 | Yes | Yes | Yes | Brief rinse OK | Dry connectors thoroughly |
| IP68 | Yes | Yes | Yes | Yes | Still dry completely before powering on |
Special Attention for IP20 Strips
IP20 strips are the most common type used in indoor cove lighting, under cabinets, and inside display cases. Because the circuit board is completely exposed, every component is vulnerable. Here are specific tips:
- Always use a dry microfiber cloth first.
- If you must use moisture, wring the cloth until it feels almost dry. One pass, then immediately follow with a dry cloth.
- Never spray any liquid near the strip. Apply solution to the cloth away from the installation.
- Use compressed air to blow dust off resistors and connectors instead of wiping them.
- Pay extra attention to connector pins. If your strip uses solderless clip connectors, dust and oxidation at the contact points can cause flickering. Clean these with a dry cotton swab or one barely moistened with IPA.
Outdoor and Wet-Location Strips
For IP67 and IP68 strips installed outdoors or in wet areas like bathroom niches and pool surrounds, cleaning is somewhat easier because the silicone enclosure protects the electronics. However, the outer silicone surface can attract dust, pollen, and mineral deposits from water splashing. A mild soap solution works well here. Rinse gently if the rating allows it, and use a soft cloth to remove any soap residue. Make sure the end caps and power connections are completely dry before restoring power, because those junction points are often the weakest link in the waterproof seal.
A Word on Warranty and Cleaning
It is worth noting that improper cleaning can void manufacturer warranties. If you use a harsh solvent and it damages the silicone sleeve, that is considered user-caused damage. We always advise our partners to stick with the cleaning methods outlined in the product datasheet. When in doubt, test your cleaning method on a small, inconspicuous section first. This is especially true for strips with specialty coatings like anti-UV layers or anti-yellowing treatments.
Conclusion
Keeping LED strip lights clean is simple when you follow the right steps. Power off, dust gently, use minimal moisture, and dry completely. A little routine care goes a long way toward preserving brightness, color accuracy, and the full lifespan of your lighting investment.
Footnotes
- Provides a foundational definition and overview of LED strip lights. ↩︎
- Highlights the crucial role of HVAC filters in maintaining indoor air quality and system efficiency. ↩︎
- Replaced with an authoritative government source (.gov) explaining lumens and their importance in lighting. ↩︎
- Details the importance of thermal management for LEDs, often provided by aluminum channels. ↩︎
- Discusses the phenomenon of color shift in LEDs and its various contributing factors. ↩︎
- Replaced with a Wikipedia page providing a comprehensive definition and explanation of microfiber cloth. ↩︎
- Replaced with a relevant article from a reputable company that explains the effectiveness and uses of 70% isopropyl alcohol for cleaning and disinfection, citing CDC recommendations. ↩︎
- Replaced with an academic journal article providing an in-depth understanding of downconverter (phosphor) degradation in LED packages. ↩︎
- Specifies the meaning of the IP20 rating for LED lighting applications. ↩︎
- Explains the IP Code standard for classifying protection against solids and liquids. ↩︎


